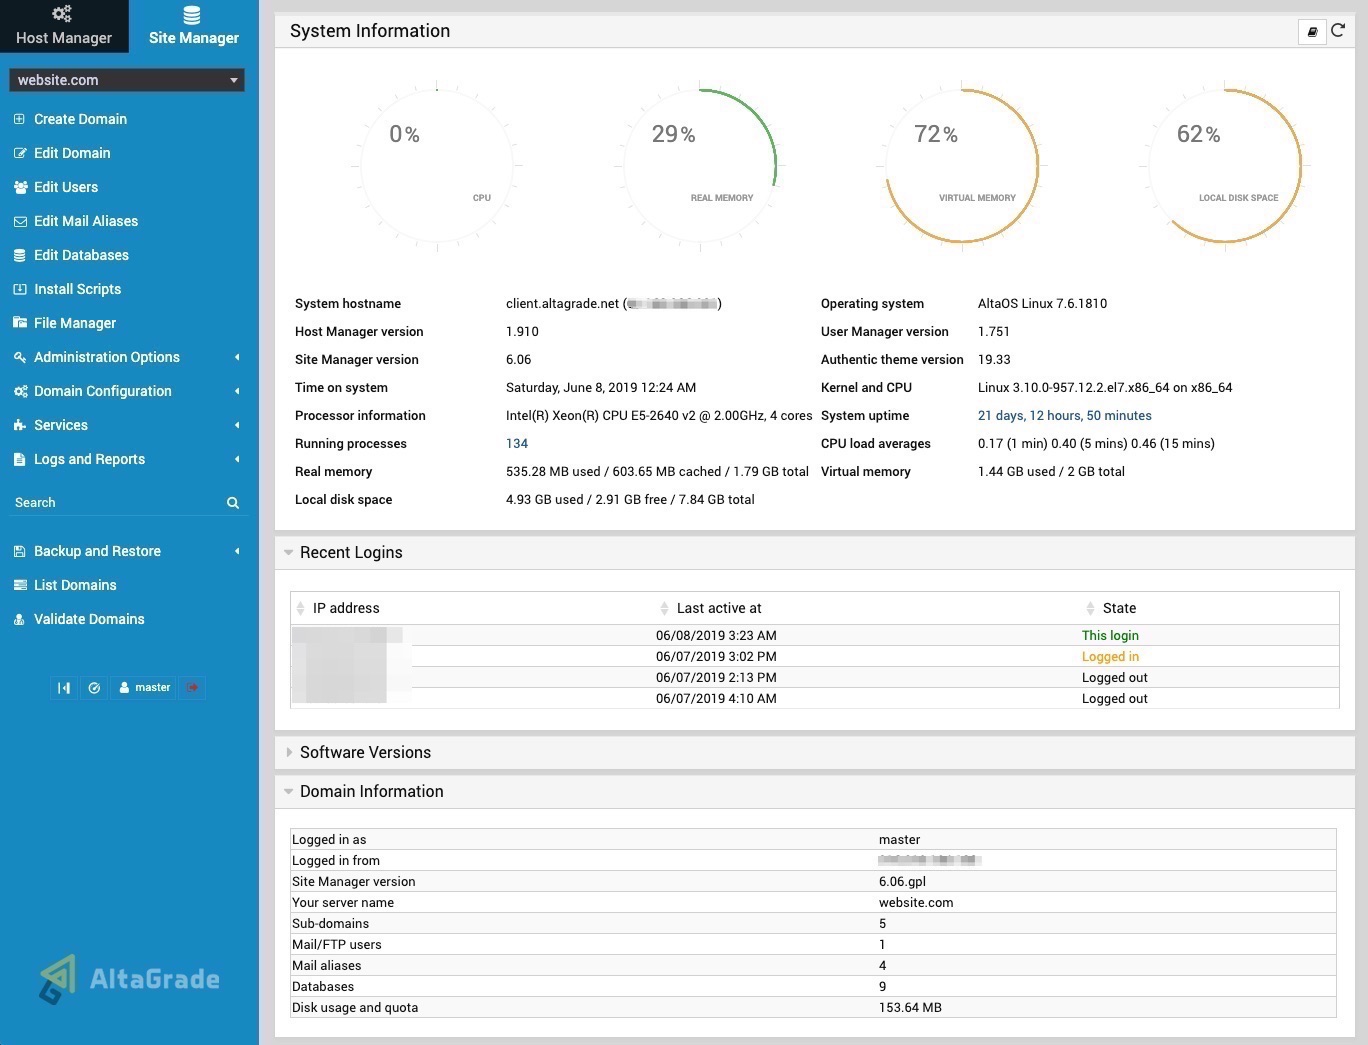
Site Manager provides a means to create, modify, and delete domains, user mailboxes and user accounts.
With its domain management features you can quickly and easily create a new website with domain records, Apache VirtualHost configuration, a home directory, a user account to manage it, mail server configuration, disk usage quotas and email addresses and aliases.
To start using the following options you need to be logged in to your AltaGrade server's control panel.
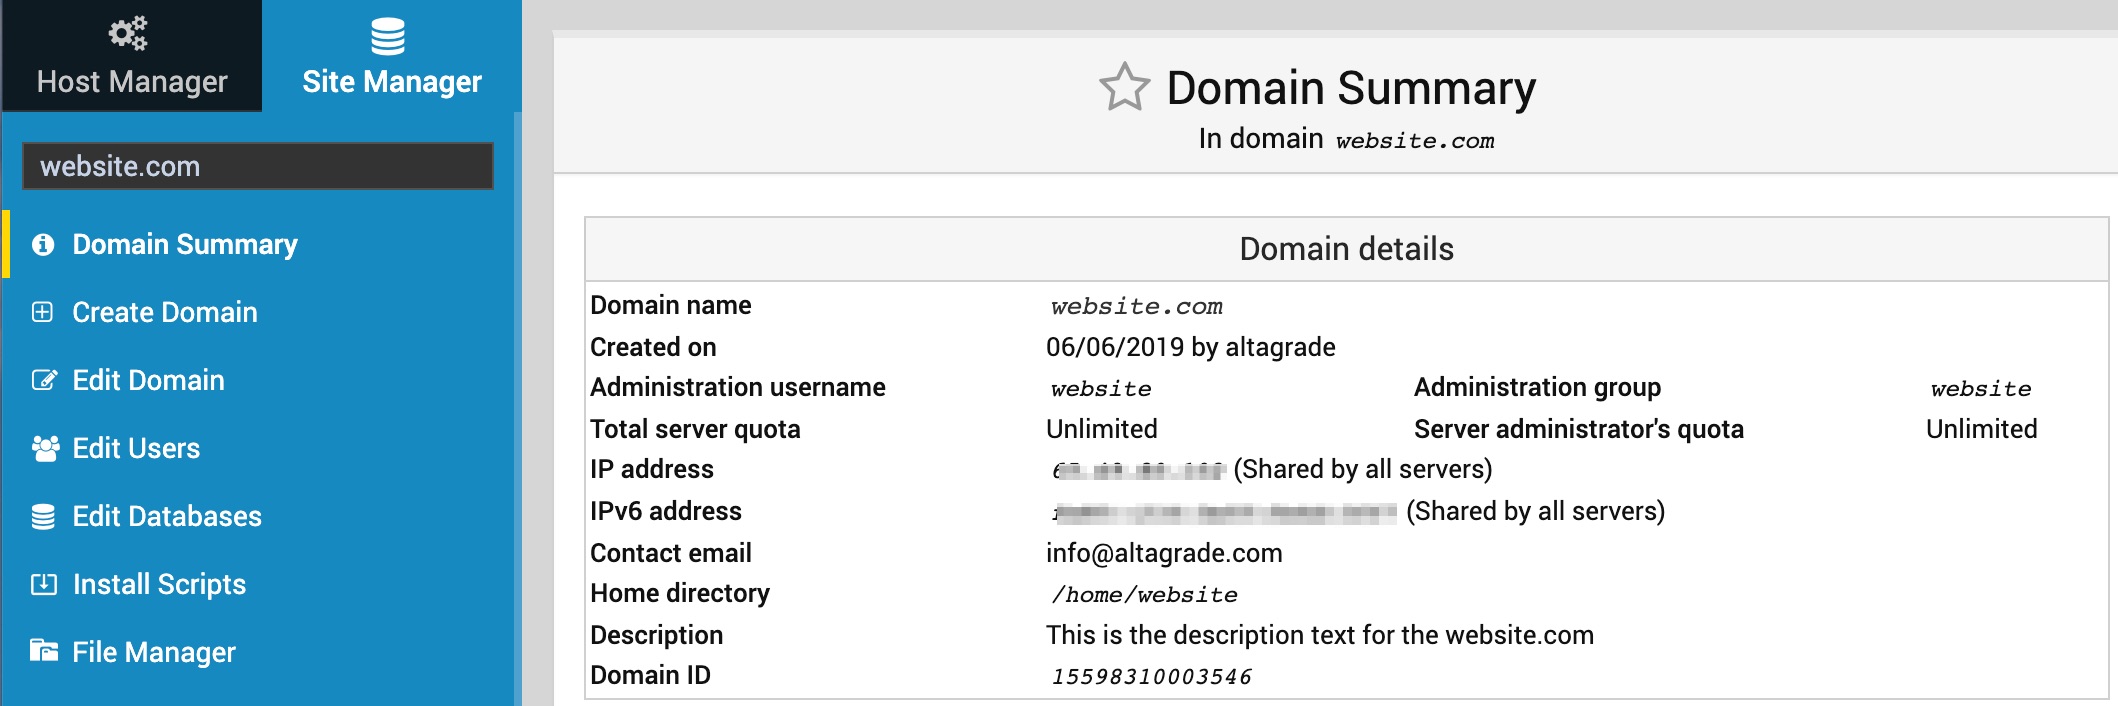
Domain Summary
If you have some websites already created and running on your AltaGrade server, click at any time on the first-top Domain Summary link on the left to find the detailed information about your website such as its domain name, when it was created, Apache username, Apache group, total quote, IPv4 and IPv6 addresses, contact e-mail address, home directory, description and domain ID.
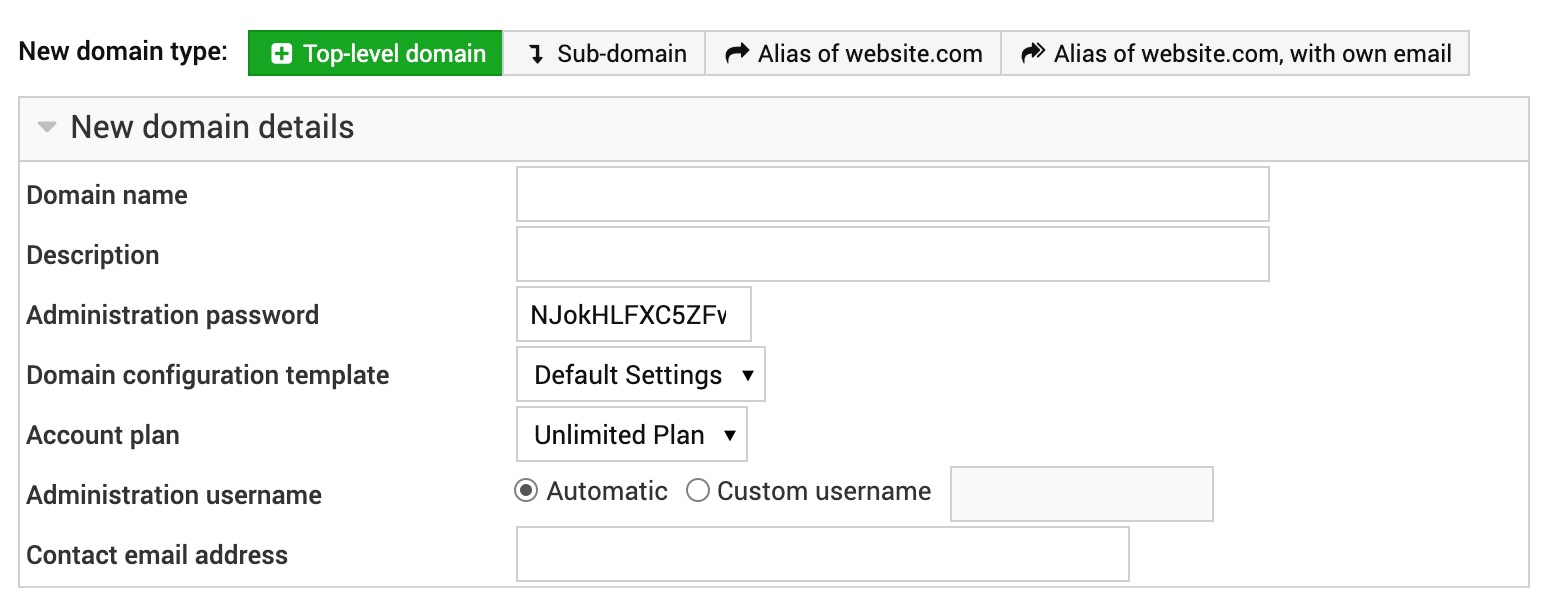
Create Domain
Clicking on the Site Manager tab and then on the Create Domain link on the blue vertical panel on the left side of the screen will open the form for creating a new domain name:
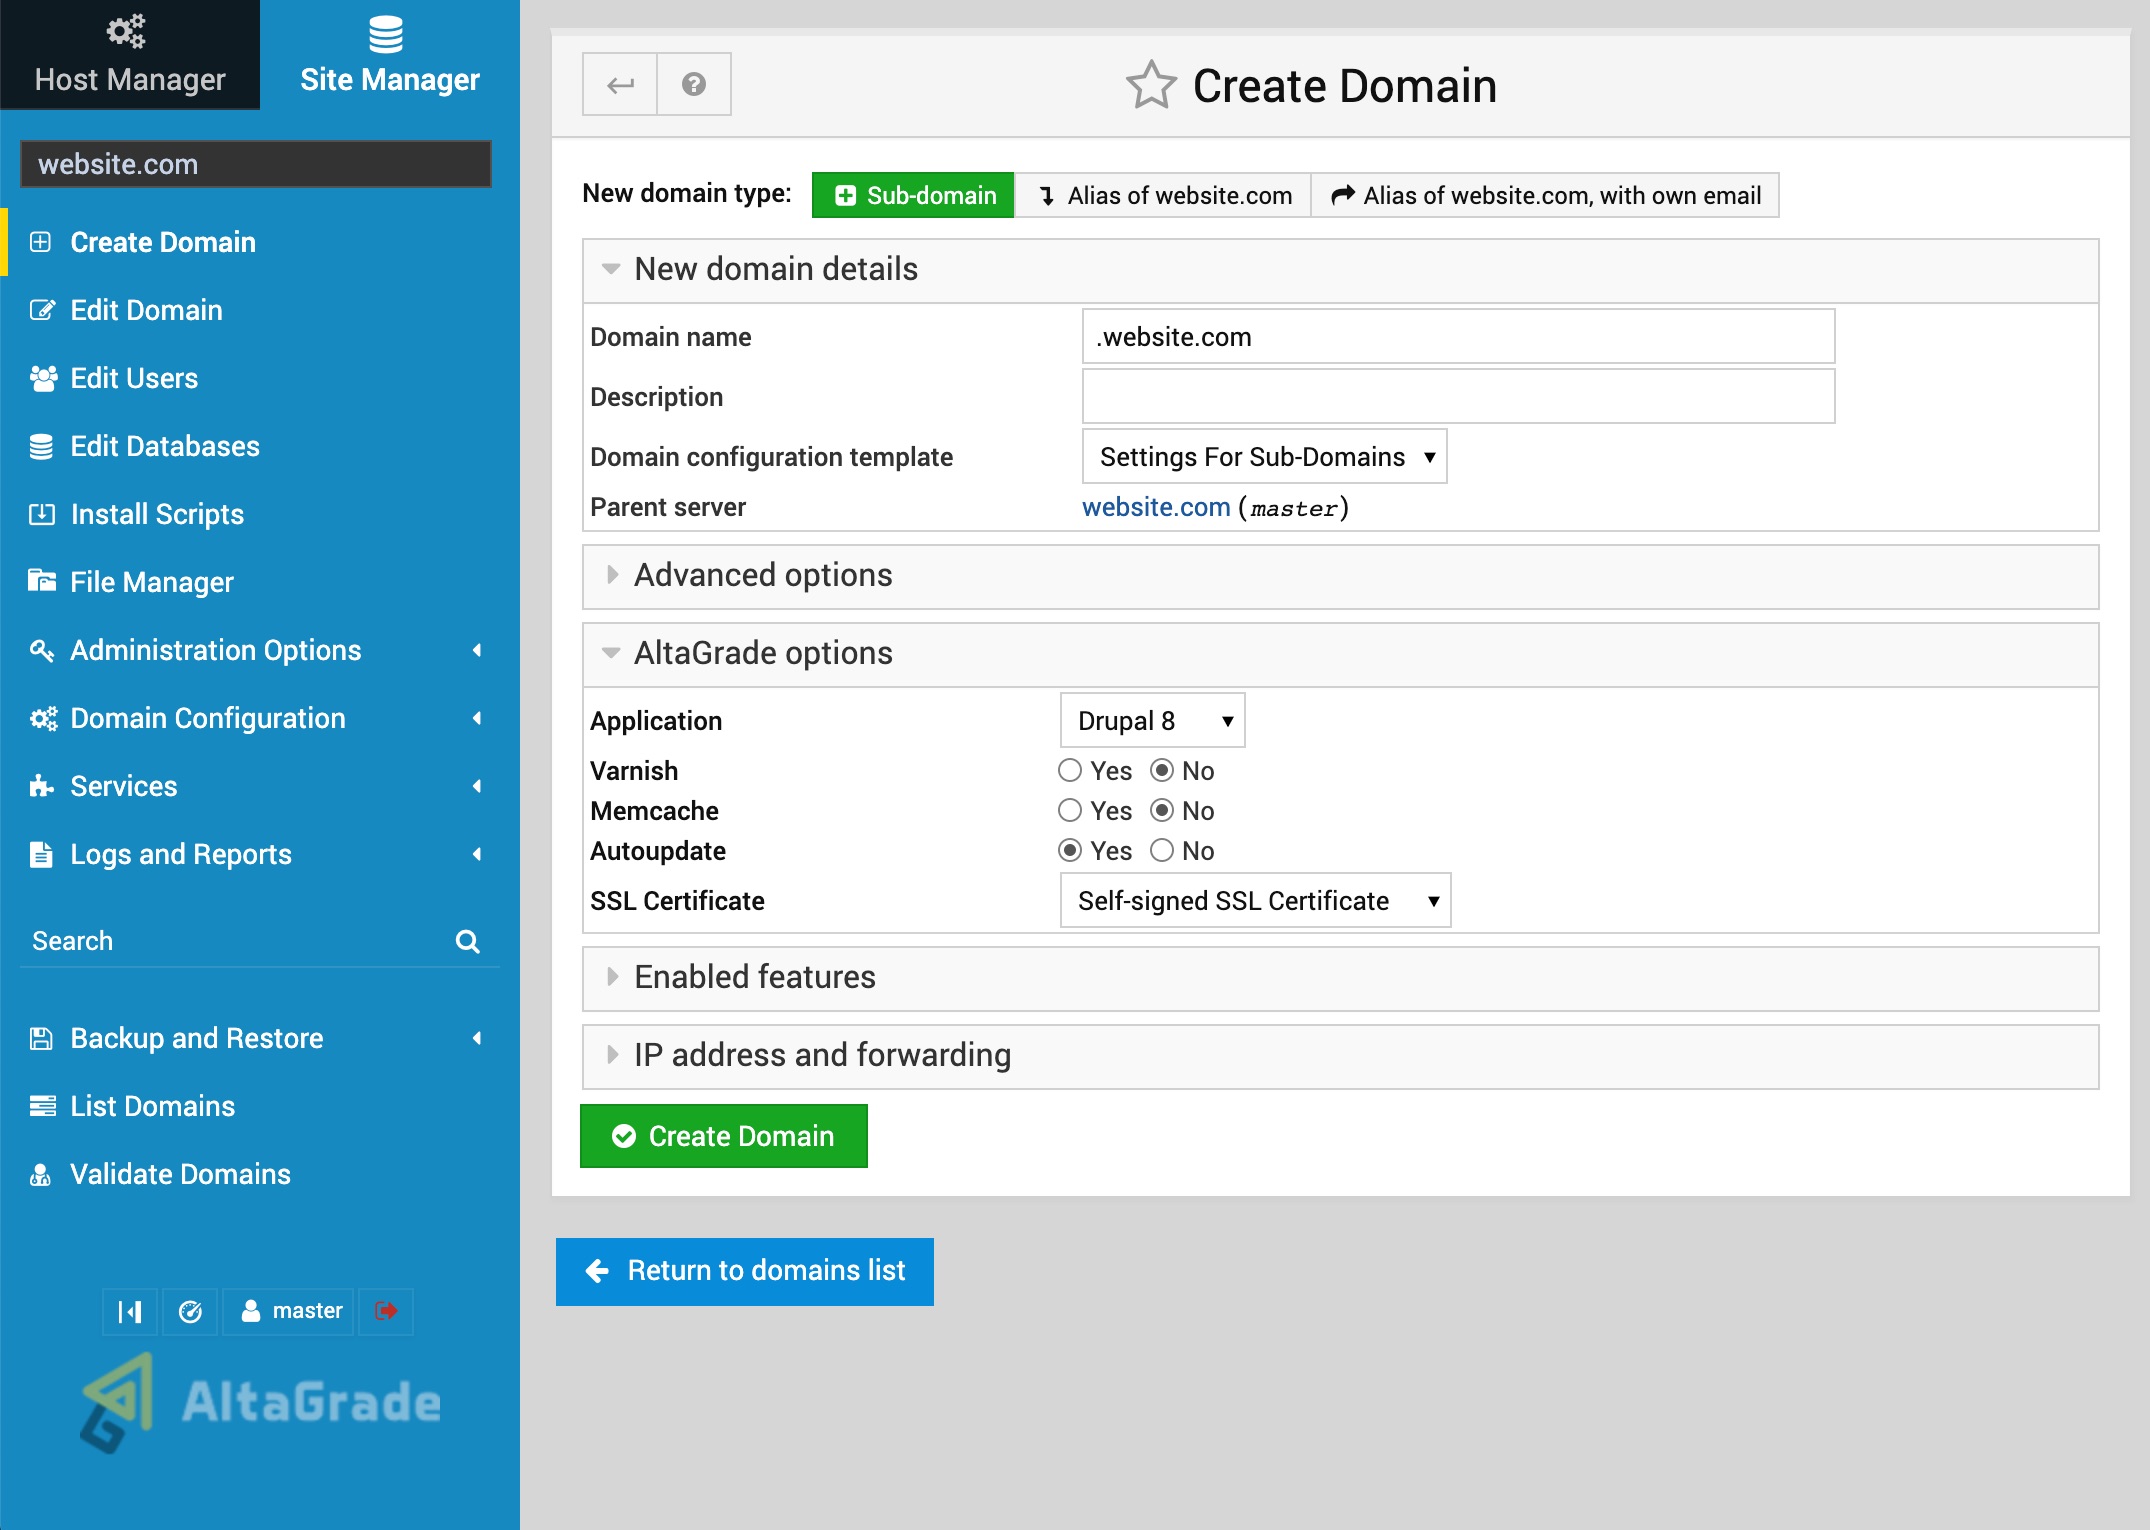
New domain details
Your Site Manager allows creating different types of websites such as websites with domains, websites with sub-domains, alias websites (parked domains) and alias websites with own email.
Domain
Creating domain websites is possible on both reseller and non-reseller accounts, however have completely different deployment structures and is done in slightly different ways.
Reseller Accounts
Only the reseller accounts can create top-level domain name websites with their own usernames, independent databases with own prefixes, and most importantly separate SSH/SFTP/GIT access per each parent domain website and document root directories created as:
/home/username-1st/public_html/
/home/username-2nd/public_html/
/home/username-nth/public_html/
The New domain details section for a reseller account looks like this:
Non-Reseller Accounts
Non-reseller AltaGrade accounts will be sent a master username associated with the parent domain website created by AltaGrade during the initial deployment in the /home/username/public_html directory. All other websites created on the same server afterwards will be automatically associated with the parent username and their document roots placed in the following directories:
/home/username/domains/website-1st/public_html/
/home/username/domains/website-2nd/public_html/
/home/username/domains/website-nth/public_html/
The New domain details section for a non-reseller account looks like this:
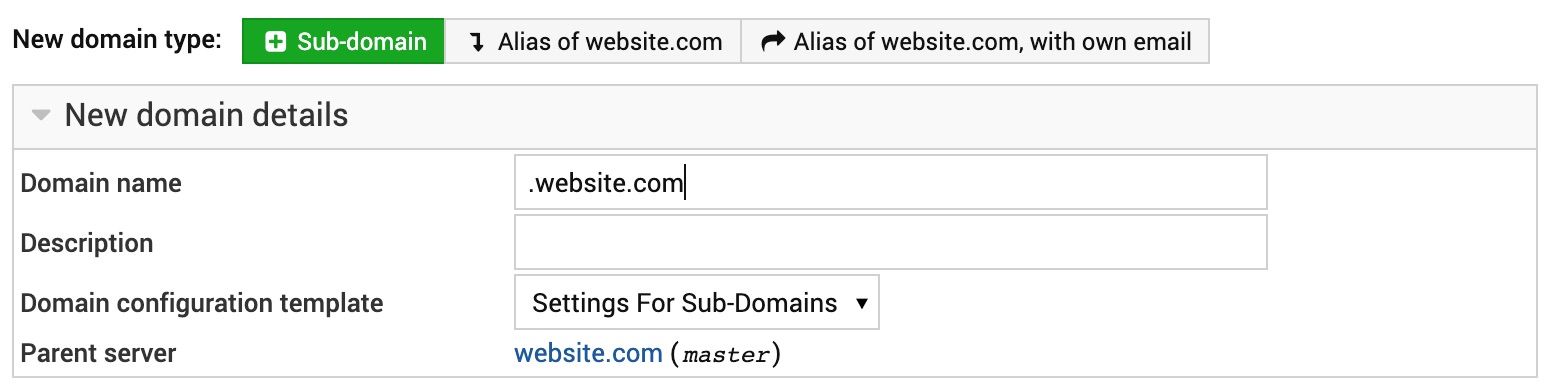
Don't worry if you had a non-reseller account and your intention was to create a standalone domain website and not a sub-domain of a parent domain website - just replace the automatically inserted .website.com with your domain name and proceed to filling in the rest of the form.
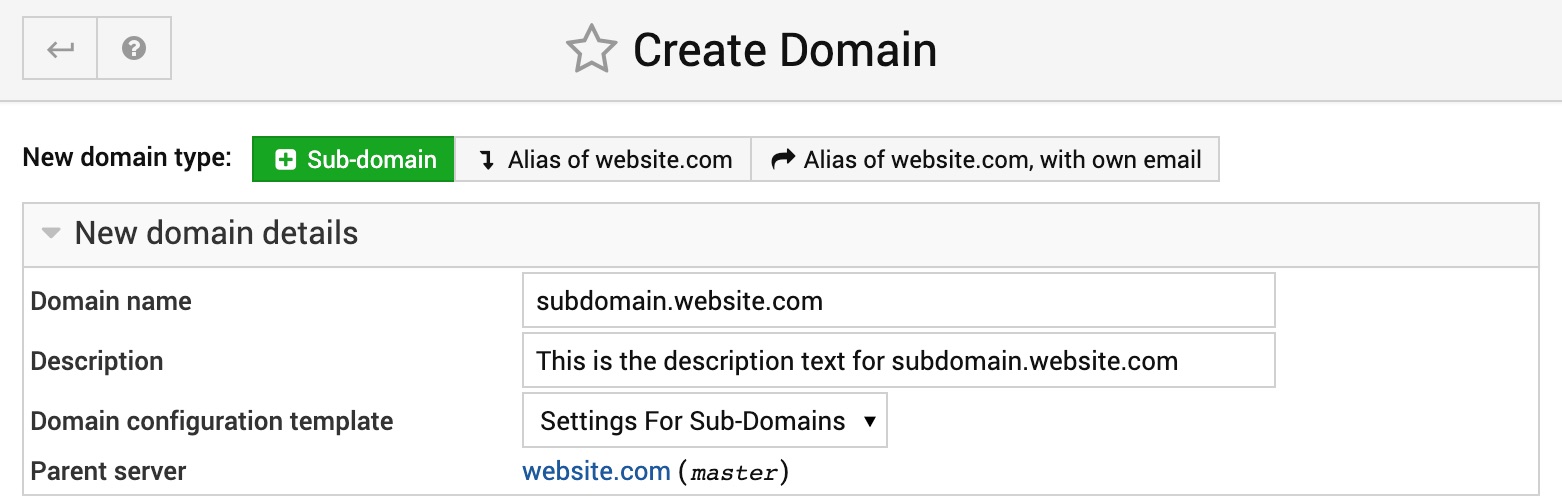
Sub-Domain
Creating a sub-domain website is similar as creating a parent domain name described in previous section. The only difference is that you need to type your subdomain in the Domain name field as a prefix to automatically placed parent domain without deleting it, so it looks like below:
Alias or Parked Domain
If you want to create an alias domain, which on some other control panels as cPanel is called parked domain, click on the second tab as shown in the below screenshot and proceed to filling in the rest of the form.
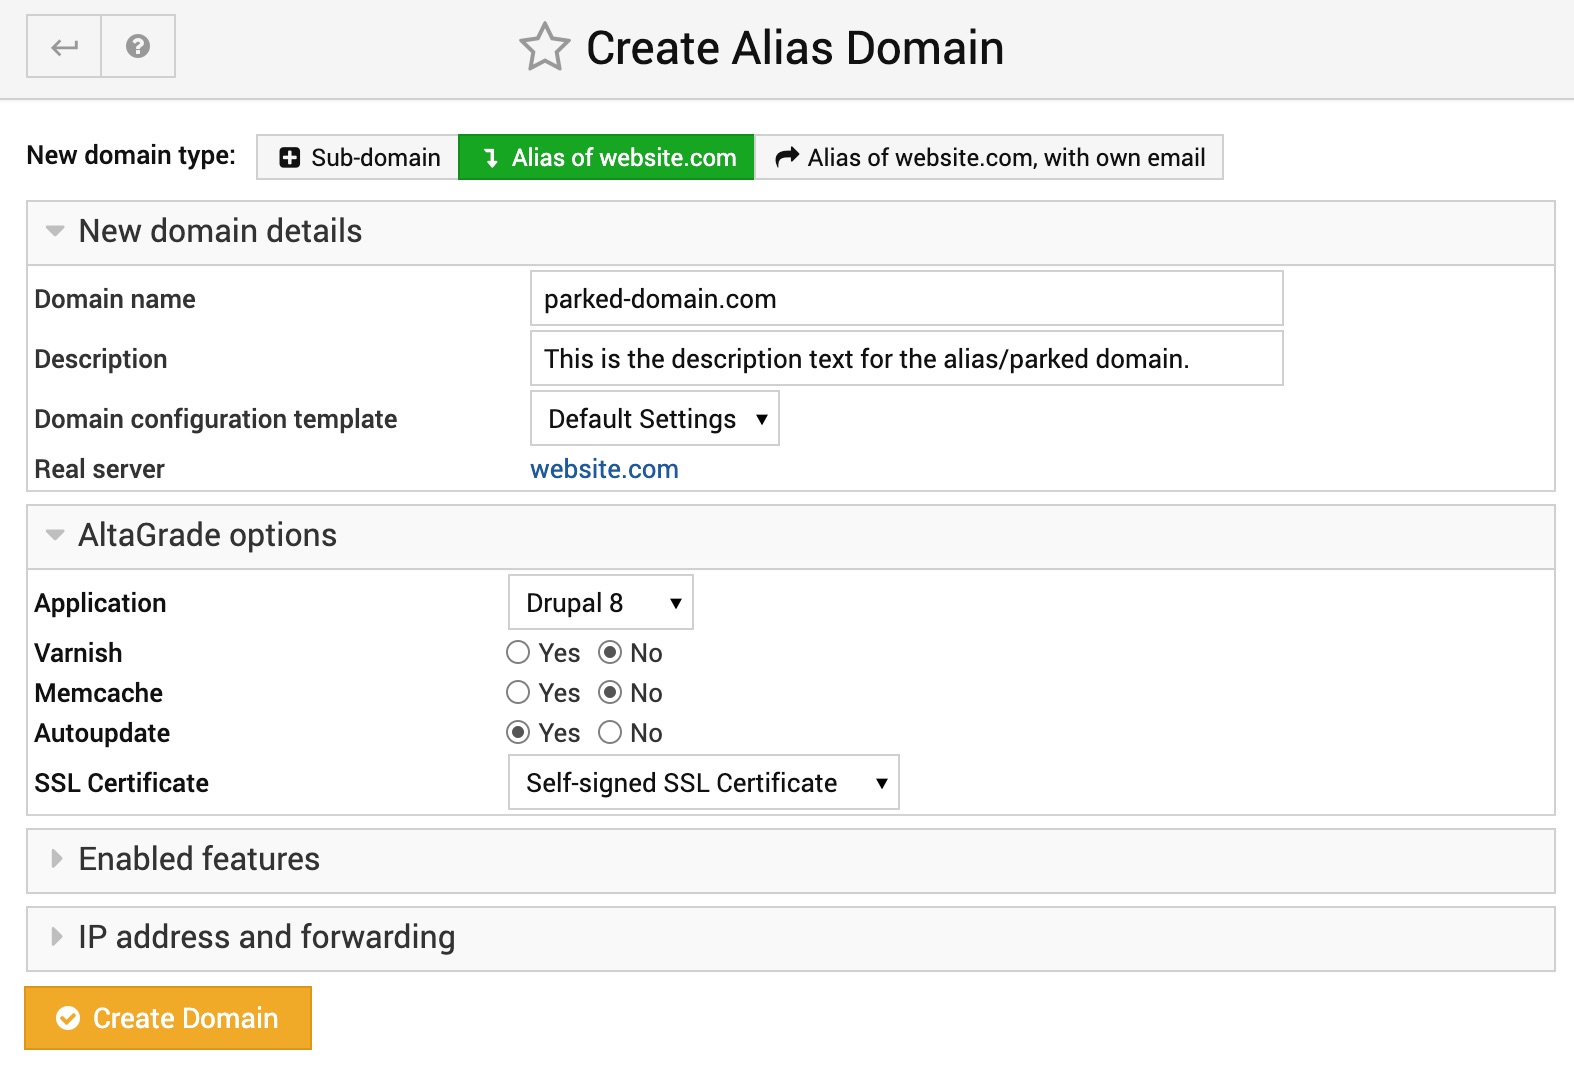
Please note that alias (or parked) domains do not have their own Apache virtual servers or document roots, because they are just sitting on top of and forwarding all the visitors requests to their parent domain websites. Alias (or parked) domains do not re-direct, but just resolve to their parent domains.
You will need to use this feature when building a multi-domain setup in Drupal or WordPress in which multiple domain names are pointed to the main domain name and what kind of content is displayed is decided within the web-application depending on the domain name in the browser's address bar.
Alias Domain with own email
If you want a domain name to be parked over another website, but at the same time to have its own e-mail accounts, then click on the third tab called Alias of website.com, with own email. The only difference from a regular alias domain described in the previous section is that you can create unlimited e-mail accounts based on the aliased (or parked) domain name.
Advanced options
There are two configurations options in this section: Prefix for mail usernames and Default database name, and you can safely ignore them as your AltaGrade server has good default values for both.
AltaGrade options
In this section you will find customized configuration options for your application such as choosing in the drop-down menu between Drupal 8, Drupal 7, Backdrop, Wordpress or Other for any other type of PHP-application; turning on or leaving off Varnish, Memcache and Autoupdate features; and choosing between self-signed, free Let's Encrypt and paid Commercial SSL certificates.

We recommend to keep the options for Varnish, Memcache and Autoupdate off during domain creation to let the process go and finish smoothly, and turn them on afterwards on the Edit Domain page. You can change this options at any time.
Varnish
Please note that turning Varnish on will automatically configure all the server-side settings and also enable the respective modules necessary for making your website to correctly interact with the Varnish server running on background, namely Varnish and Cache Expiration modules. It will also modify the settings.php file of your website adding custom configuration lines for Varnish module, which should never be removed manually.
If you ever will need to turn Varnish off, then just come back to the control panel, uncheck this option and save the domain name. However, please note that all AltaGrade servers are configured so Apache listens to port 8080, while Varnish backend listens to port 80 and turning Varnish off on the control panel will not automatically revert custom port settings. Therefore, if you need to completely get rid of Varnish for all your websites (because ports are always et server-wide), then file a request ticket, so we make necessary changes manually.
Memcache
Likewise, turning Memcache on will automatically configure all the server-side settings and also enable the respective modules necessary for making your website to correctly interact with the Memcache backend running on the server, namely Memcache and its Memcache Admin submodule. It will also modify the settings.php file of your website adding custom configuration lines for Memcache to work correctly, which should never be deleted manually. Just login to control panel and turn this option off if you ever will need.
Autoupdate
Updating your Drupal websites in timely manner is very important, especially taking into consideration that several major Drupal security vulnerabilities were found and widely exploited in recent years notoriously known as Drupalgeddons and that newer security vulnerabilities are consistently reported and some times badly exploited.
AltaGrade is security-centric hosting vendor, so we spent great efforts to come up with very efficiently functioning Drupal core update procedure, always running in the background. However, for your individual Drupal websites to interact with this automated process, you need to turn the Autoupdate option on.
Note that with this option is turned on the core and core modules of your Drupal websites will be automatically updated to the latest secure version effectively overriding all the patches and customizations you might have in the core. But then if you are a good Drupal developer, then you know you should never hack the core, so we don't see reasons why this option should be ever turned off.
SSL Certificate
AltaGrade is a hosting vendor fully adopted the HTTPS-everywhere practice. With all the major browsers starting to enforce HTTPS, it is becoming imperative to have HTTPS-compatible websites, which in turn requires to have properly installed SSL certificates for them. So you have several options on your AltaGrade server's control panel for SSL certifications when creating new domain names:
- Self-signed SSL Certificate is chosen by default. Leave this option intact for now if your domain name has not yet been pointed to your AltaGrade server's IP address;
- If your domain name has been pointed to your AltaGrade server and is already pinging to its IP address, and if you do not want to spend money for purchasing a commercial SSL certificate, then go with free Let's Encrypt SSL Certificate;
- If your or your organization's preference is to have the strongest SSL encryption using SHA-256 and 2048 bit RSA keys, recognized by 99.9% browsers, ideal for e-commerce websites A-grade commercial SSL Certificate, then place an order with us for only $14.95 and go with this option.
Enabled features
We recommend to leave all the options in this section for - setting up DNS zone and Apache records, creating database, and enabling AWstat reports - turned on. However, if your website is using one of the multiple modules for Google Analytics existing on Drupal.org, then probably you want to turn the last option off.

There are more options under the Enabled features for enabling mail, spam and virus filtering for your website and if you don't see them listed, then they have not been enabled yet on your parent domain name. You can verify that choosing your parent domain in the drop down menu on the left and then clicking on Edit Domain:

As you can see three additional mail-related features are greyed out. For security reasons, we ship all non-reseller AltaGrade servers with mail service turned off by default for the following reasons:
- Many customers delegate their mail needs to professional mail services such as G-Suite, Zoho Mail or Office 365;
- Some customers simply do not need e-mail accounts for their websites for various reasons, for example, because they might be using modules like SMTP to forward messages and notifications to their e-mail accounts on external services like Yahoo or GMail;
Therefore, if you want your website to have e-mail accounts, then please file a request and we will promptly enable and configure mail support for your website.
Edit Domain
You can re-visit the Edit Domain page to see the Domain details, change some Configurable settings, see Quotas and limits and the same AltaGrade options and Enabled features previously described under the Create Domain section.
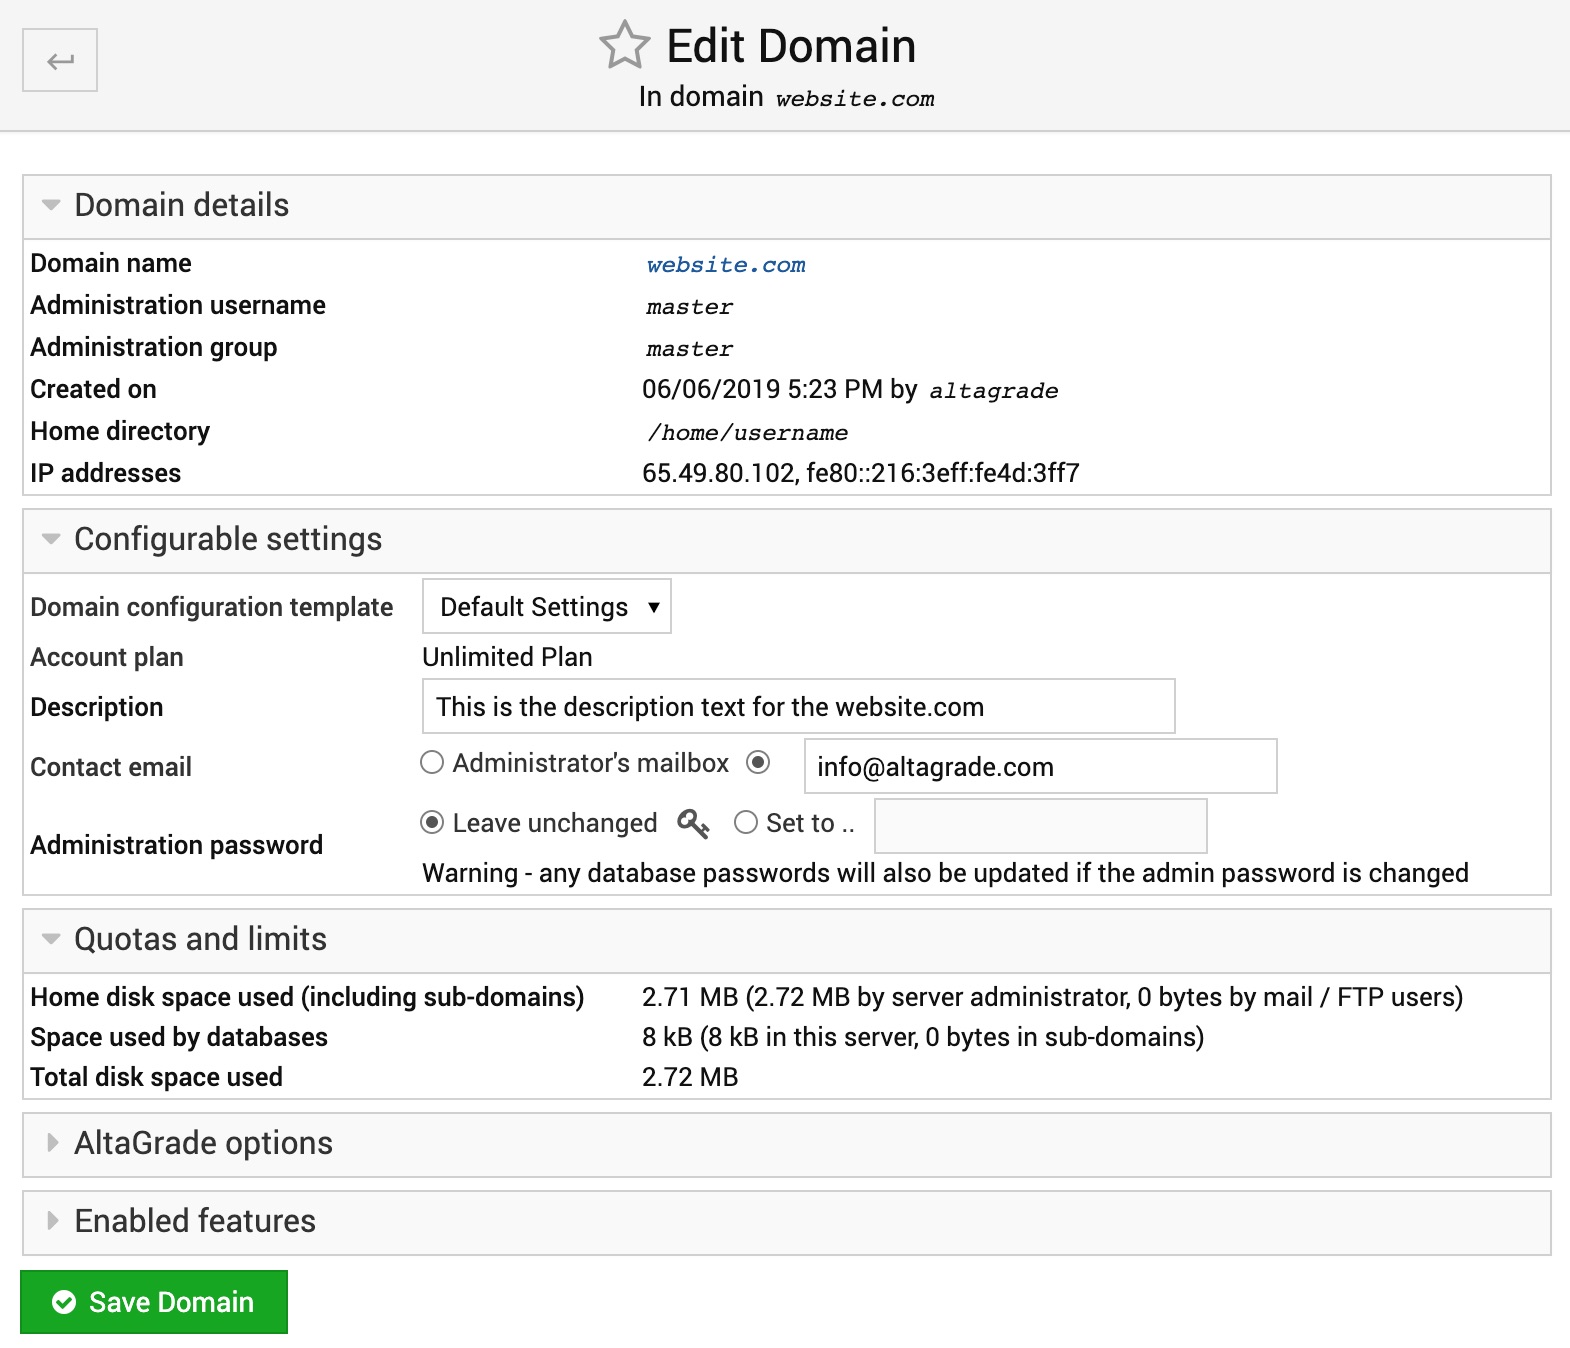
Domain details
As you can see in the above screenshot, in this section you will find such domain details as Domain name, Administration username, Administration group, Created on date information, Home directory and both IPv4 and IPv6 addresses for your website.
Configurable settings
On non-reseller accounts the Domain configuration template will always be set to Default Settings well-tuned by AltaGrade. Reseller accounts will be able to build their own configuration templates.
Account plan
Usually a single user, web agency or an organization subscribe to a non-reseller AltaGrade server to be able to host as many websites as the resources allocated for the server can carry on. And since the server resources are shared among websites of a single party, this option is always set to Unlimited Plan.
On the contrary, the subscribers for the reseller AltaGrade servers will be able to compose multiple hosting plans with different amount of resources, thus effectively locking their customer sub-accounts within the resources allocated to respective hosting plan.
Description
The description can be any text suitable for your needs. This field is useful to differ websites from each other or quickly identify needed one among large number of websites listed on the List Domains page.
Contact email
You can set any working e-mail to receive various notifications regarding your website such as about automated updates, validation errors, backup failures or to retrieve website information with all the access details.
Administration password
You can leave the administration password for your website used for connecting to it via SSH/SFTP/Git unchanged or to set a new one. If you want to see what was the administration password for your website or to copy it, then click on the lock sign just to the right of Leave unchanged option and then a small pop-up will appear displaying both the username and password for your website.
Quotas and limits
In this section you can see how much of storage space is used by your website, including with its sub-domains, storage space used by the databases for your website in its sub-domains and the total disk space used.
AltaGrade options
This section is exactly the same as described under the Create Domain > AltaGrade options.
Enabled features
This section contains the same options which are described in Create Doman > Enabled features.
Edit Users
The Edit Users can look differently on different AltaGrade servers depending on whether mail service for the respective domain is enabled or not. If you didn't need to have and therefore never filed a request to enable the mail service for your website, then this page on your AltaGrade server should look like on below screenshot:
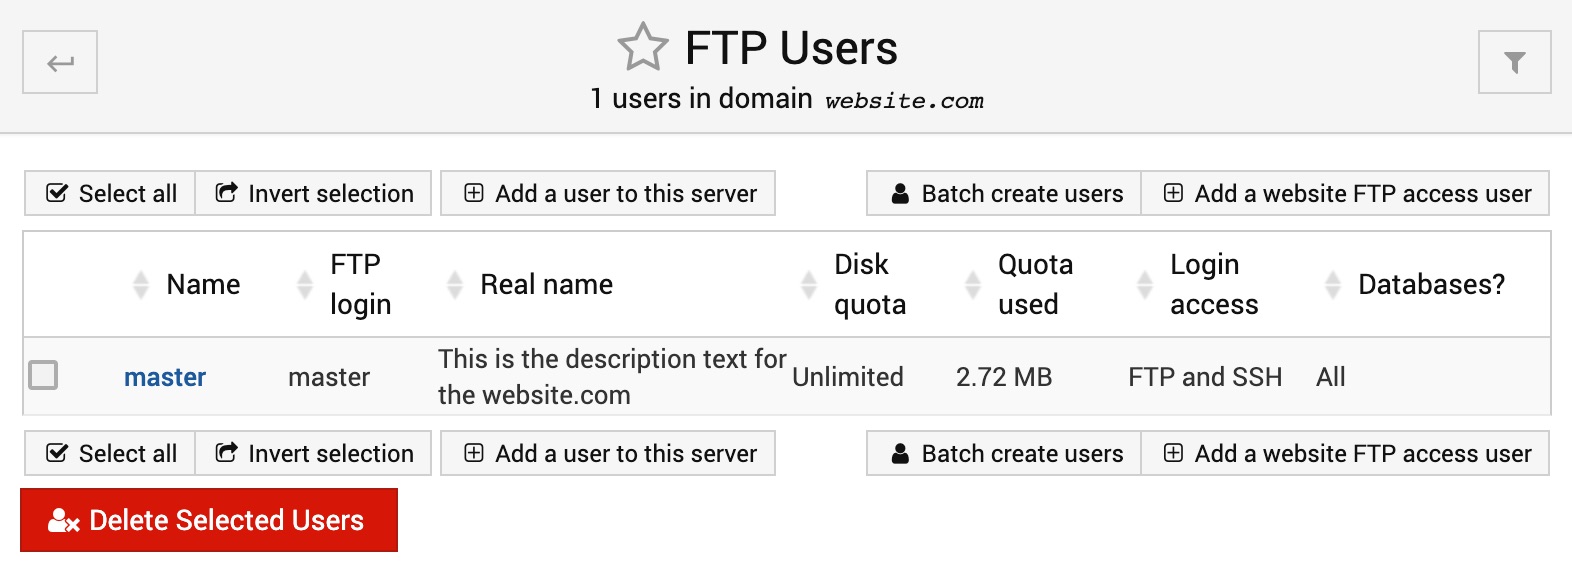
Note that for security reasons, the regular FTP protocol on all AltaGrade servers are turned off, so all connections must be carried out via SSH/SFTP/Git protocols. Therefore, creating regular FTP users is considered useless, so if mail service was never enabled for your website, then this page can be totally ignored.
However, if mail service feature is enabled then you will see slightly different page with the title Mail and FTP Users:
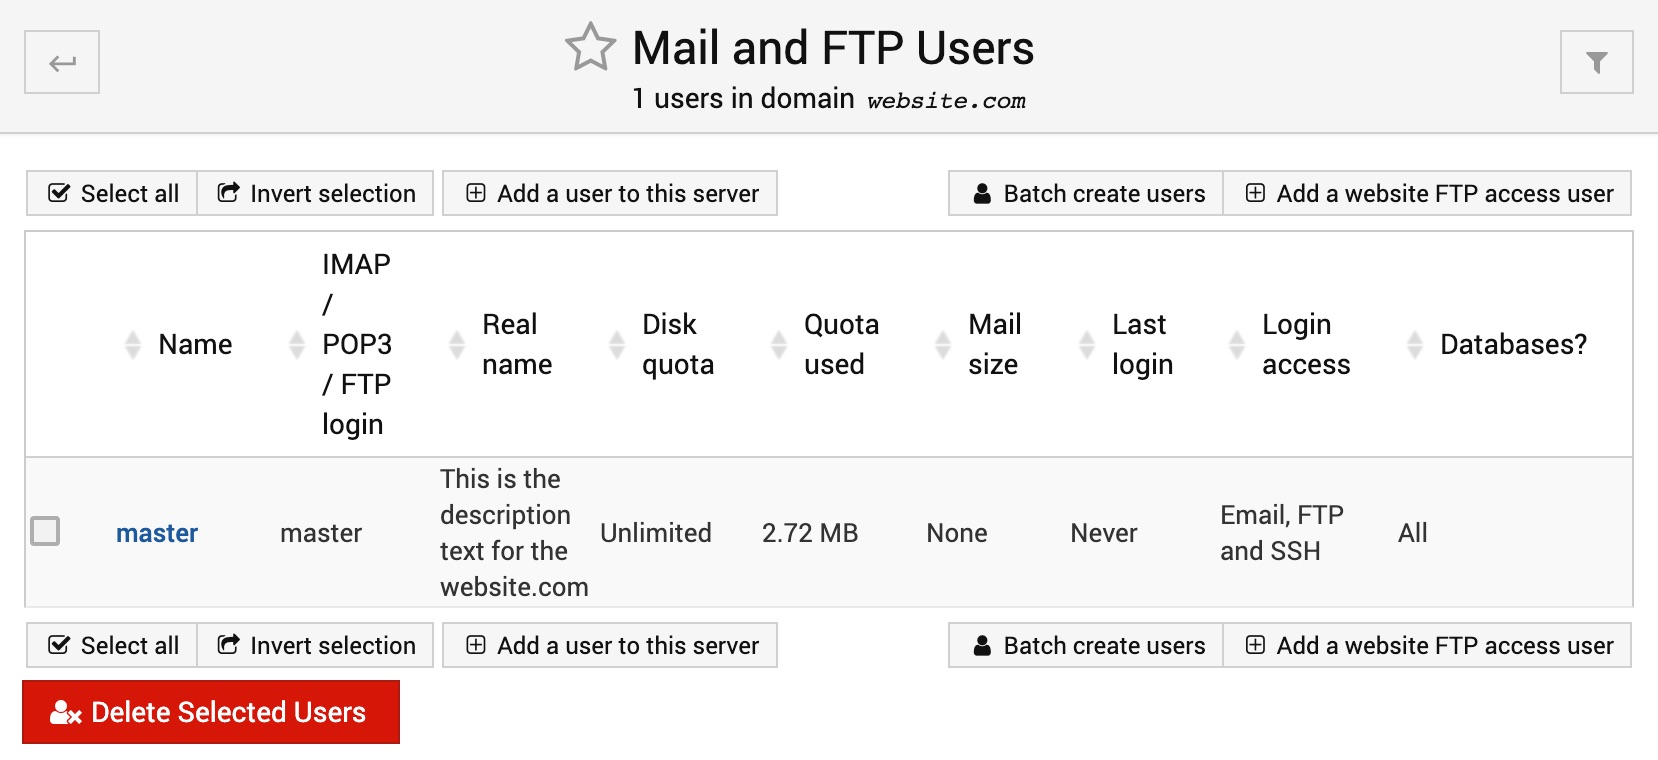
And since FTP is disabled on AltaGrade servers ignore the FTP part everywhere, which leaves only two following useful options on this page: Add a user to this server and Batch Create Users.
Add a user to this server
To create an e-mail account, click on the Add a user to this server button and fill in all the form on the next Create User page:
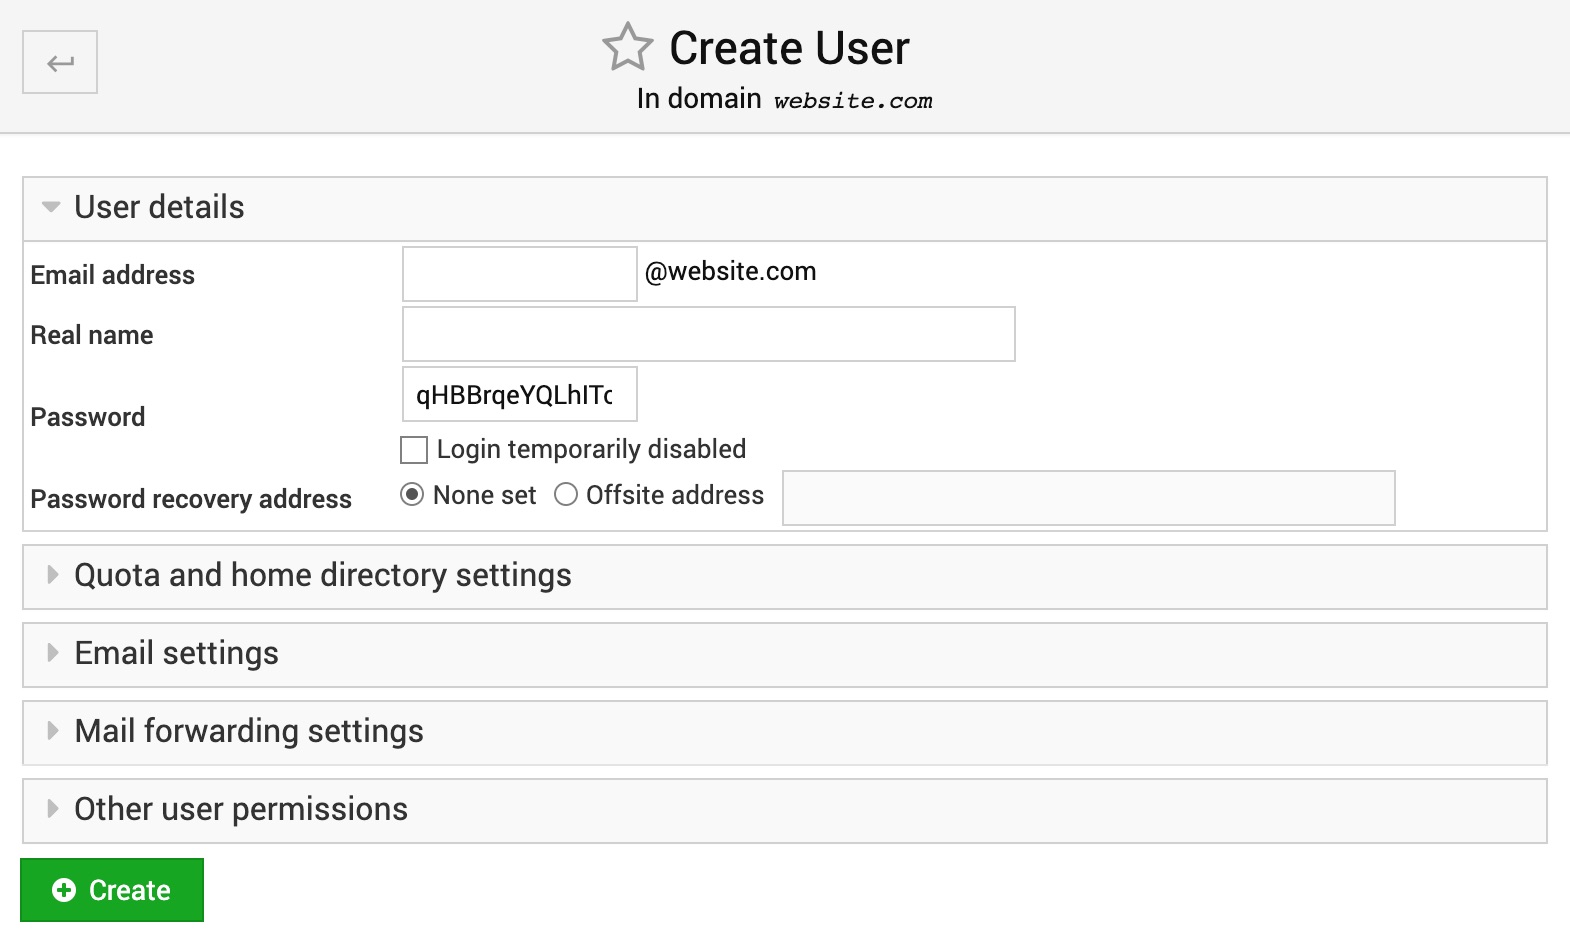
User details
Indicate what should be the prefix part to the left of @ sign of new e-mail address, real name of a person for whom the e-mail address is being created, leave the automatically generated password or type in your own one, check on the Login temporarily disabled option if you need to create the e-mail address at the moment, but enable it later some time, and finally leave none set or indicate an offsite e-mail address for the password recovery purpose.
Quota and home directory settings
You can set unlimited or limited quota for the e-mail's home directory, and either leave the home directory automatically created for the e-mail address by default settings or set a custom directory within the websites home directory. While setting different quotas for e-mail accounts at your discretion is a good idea, we recommend not to bother about changing and to leave intact the default home directories for e-mail accounts.

Email settings
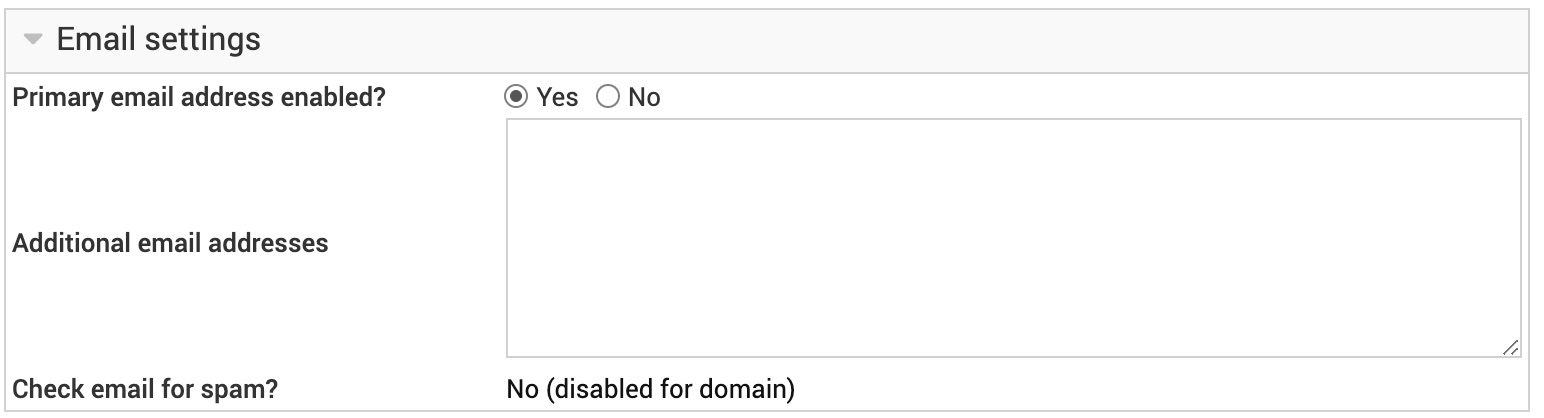
Primary email address enabled?
If you want the newly created e-mail address to start working right away, then leave the Primary email address enabled? options set to Yes. You may want to select No instead if you will enter a different email address in the Additional email addresses field.
Additional email addresses
This text box can be used to easily add extra email aliases for this user. These aliases will also be visible and editable in the mail aliases list.
Check email for spam and viruses?
By default, when spam and virus filtering is enabled for a domain, it will apply to all mailboxes in that domain. However you may want to disable this for certain account, such as one that is setup to do spam filtering on the client, or is the recipient of all spam for the domain. To do this, change this option to No.
Mail forwarding settings
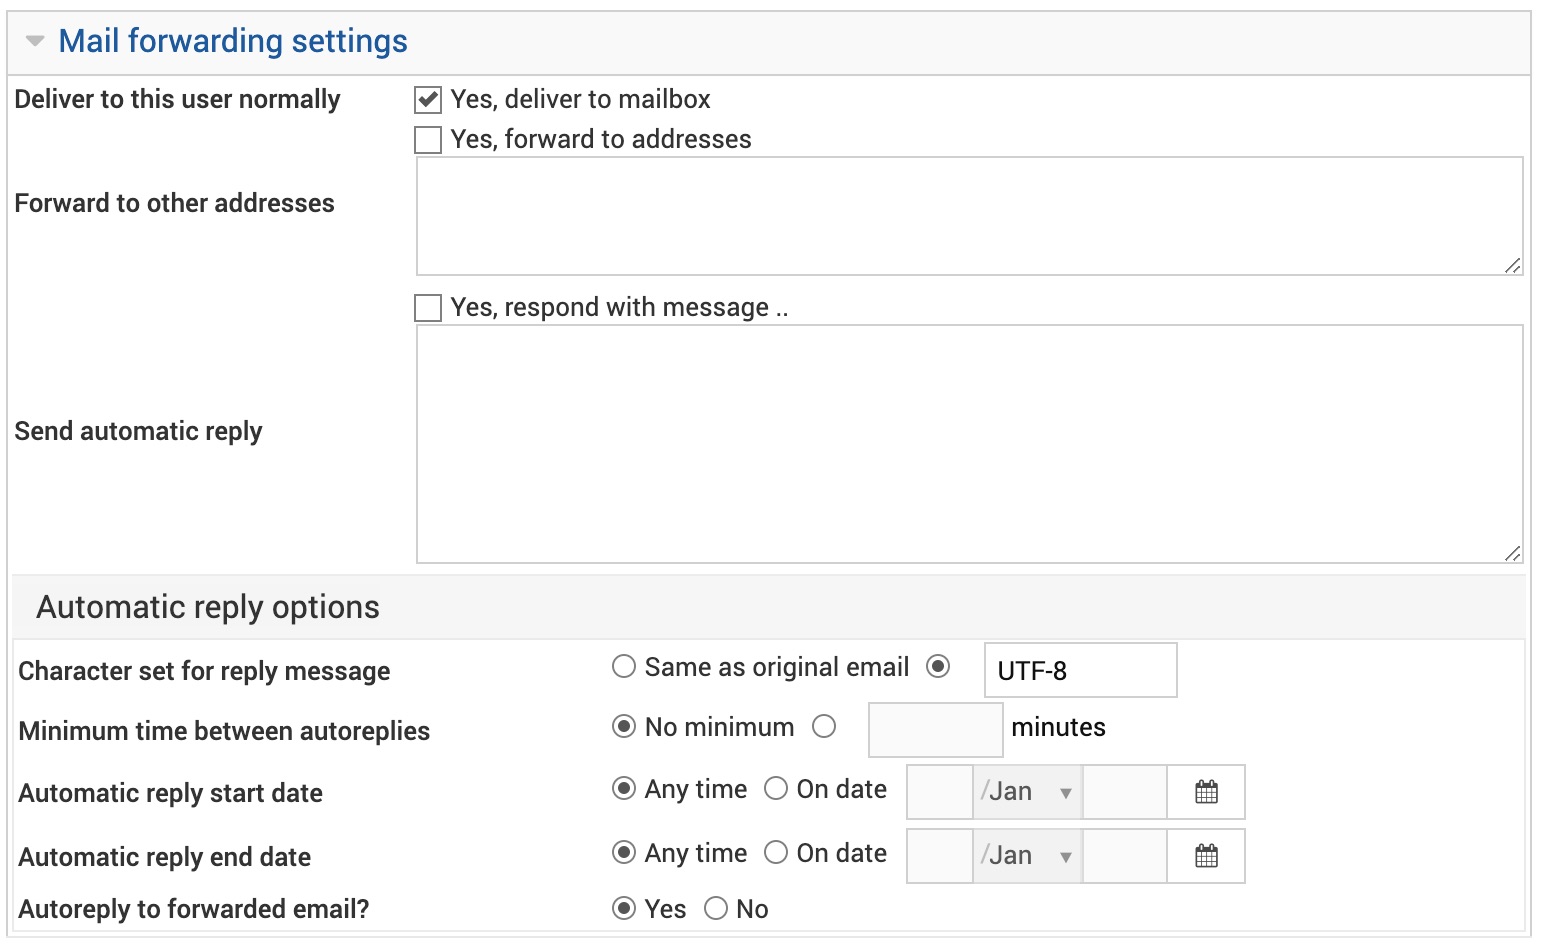
Deliver to this user normally
When this option is checked, email to this user will be delivered to his mailbox, after passing through any spam filtering. Normally you do not need to check this, as it will happen automatically if no other forwarding or autoreply is enabled. However, if you do setup a forwarding address or automatic reply but still want the user to keep a copy of his email, this option should be selected.
Forward to other addresses
When this option is enabled, any email to this user will be forwarded to the addresses entered into the adjacent text box. These must be full addresses with an @-sign, and can be in the same domain or a different one.
Send automatic reply
When this option is checked, any email to this user will trigger an automatic reply containing the text entered into the adjacent text box. The text can include additional email headers at the top, like:
Subject: Your autoreply subject
Cc: [email protected]

This is your autoreply message.
Have a nice day!
Automatic reply options
Character set for reply message
If your autoreply message is not in US-ASCII characters, you should enter the correct character set here in order to ensure it is properly formatted in the recipient's mail client. The default is the character set currently being used by your browser.
Minimum time between autoreplies
When automatic responses are enabled, this option can be used to limit the rate at which replies are sent to each sender. If a second message arrives from the same sender in the period entered here, an automatic response will not be sent. This is useful for preventing mail loops in which two autoresponders are emailing each other!
Automatic reply start date
When Any time is selected (as it is by default), your AltaGrade server will send an automatic reply regardless of the date email was received. However, you can select On date and enter a date into the adjacent fields to prevent autoreplies from being sent before that day. This can be useful when setting up an autoresponder for someone who is going on vacation on a known date.
Automatic reply end date
When Any time is selected (as it is by default), your AltaGrade server will send an automatic reply regardless of the date email was received. However, you can select On date and enter a date into the adjacent fields to prevent autoreplies from being sent after that day. This can be useful when setting up an autoresponder for someone who is returning from vacation on a known date.
Autoreply to forwarded email?
By default, even email that has been forwarded to this user via another address will be automatically replied to. This option allows you to limit autoreplies to messages sent directly to the user.
Other user permissions
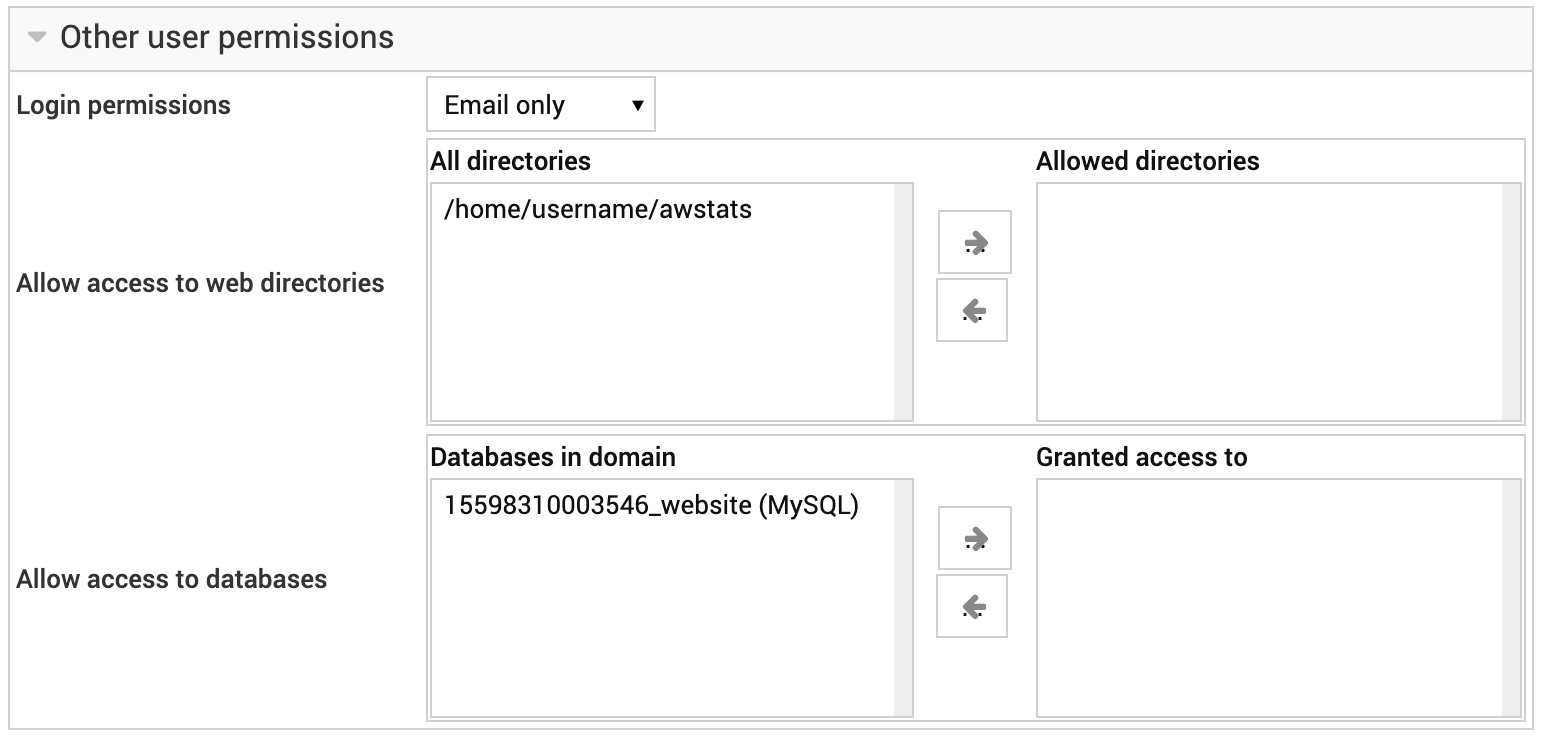
Login permissions
This menu determines what kind of login access the user is granted. Typically you would have a choice of email only or email and FTP, but since insecure FTP protocol is disabled by default on AltaGrade servers, leave this to Email only always.
Allow access to web directories
This shows all password-protected web directories configurable in the Protected Directories page for this virtual server, and allows you to select which ones this user will be granted access to using his login and password.
Allow access to databases
This field allows you to select which databases owned by this domain the user can also login to. To add a database, select it from the left-hand list and click the -> arrow. The user's login and password will be the same as those he would use for IMAP. By default, he will be granted full access to all tables in the selected databases.
MySQL only supports usernames up to 16 characters long, so for a user with a long account name only the first 16 characters are needed when logging in to the database.
Batch Create Users
This page allows you to create multiple mail users at once from a text file. This file must list one user per line, and each line must have the following format:
username:realname:password:ftp-flag:email-flag:quota:[extras]:[forwards]:[databases]
Edit Databases
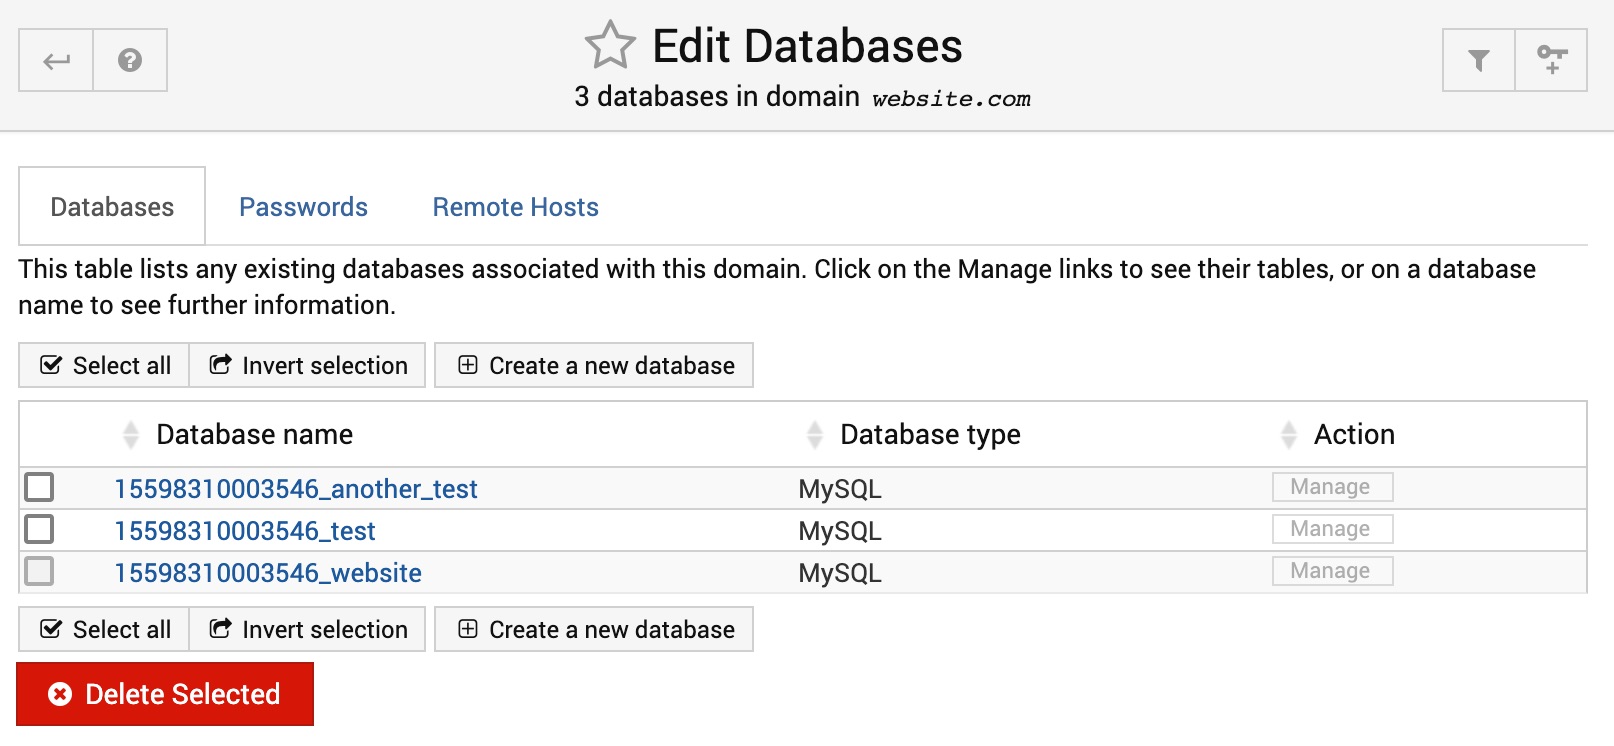
Databases
This page lists all databases that are currently owned by the domain, and allows the creation of addition databases. You can also delete multiple databases (if they were created before) by selecting them from the list and hitting the Delete Selected button. To view the actual tables and data in a database, click the Manage link next to the database name in the table. To see the size of the database, click on its name.
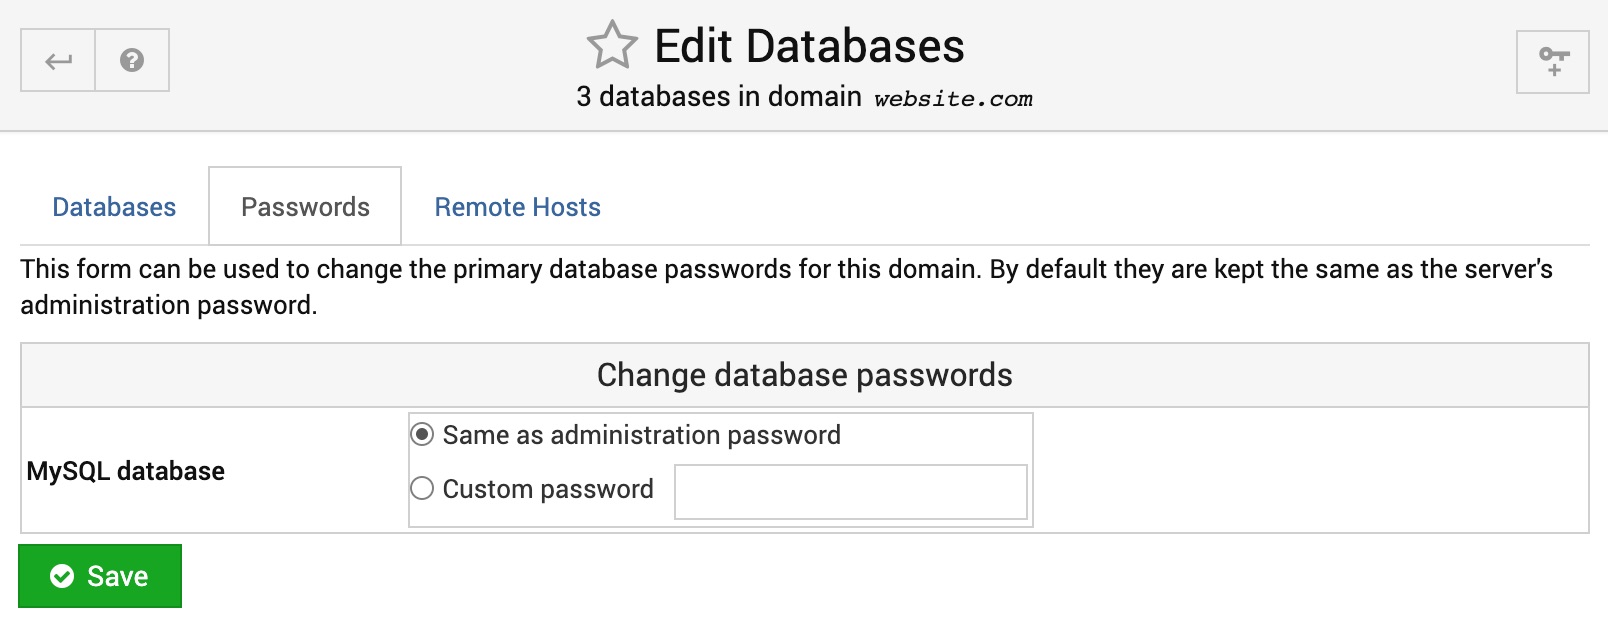
Passwords
The form on this page can be used to change the primary database passwords for the domain. By default they are kept the same as the server's administration password.
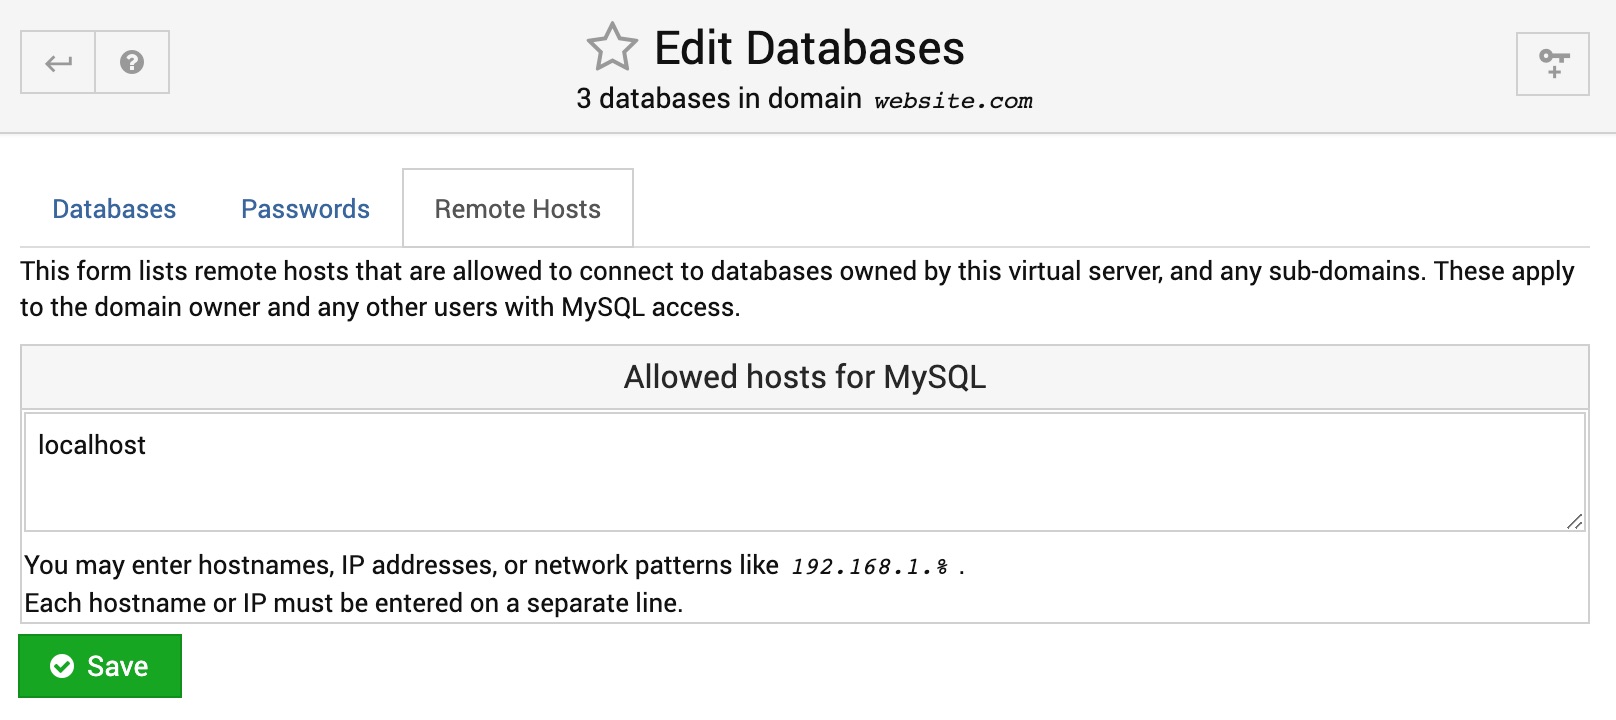
Remote Hosts
The form on this page lists remote hosts that are allowed to connect to databases owned by this domain, and any sub-domains. These apply to the domain owner and any other users with MySQL access.
Install Scripts
This page allows you to install various third-party website scripts into this virtual server's web directory. If you already have one or more script installed, it can also be used to view details about those scripts, upgrade or un-install them.
Important note: If you are installing one of web-applications of AltaGrade's specialty - Drupal 8, Drupal 7, Backdrop or Wordpress - automated installation process for them, which not only pulls the latest secure version of chosen application, but also automatically configures the database connection and sets well-tuned initial configurations.
Do not use this page to install Drupal 8, Drupal 7, Backdrop or Wordpress and go with application selection options under the AltaGrade options.
The list to be periodically reviewed and extended. At the present you can install any of the following web-applications:
Choose a script to install
To install a script, first go to Edit Domain page and make sure the Other option is selected for the Application field and that your website's document root doesn't have any other custom scripts and so is ready for installing a new script. Then select a desired application from the above list and click on the Show Install Options button.
Script install options
Let's assume you have selected Joomla at this step, so on the next page you will see:
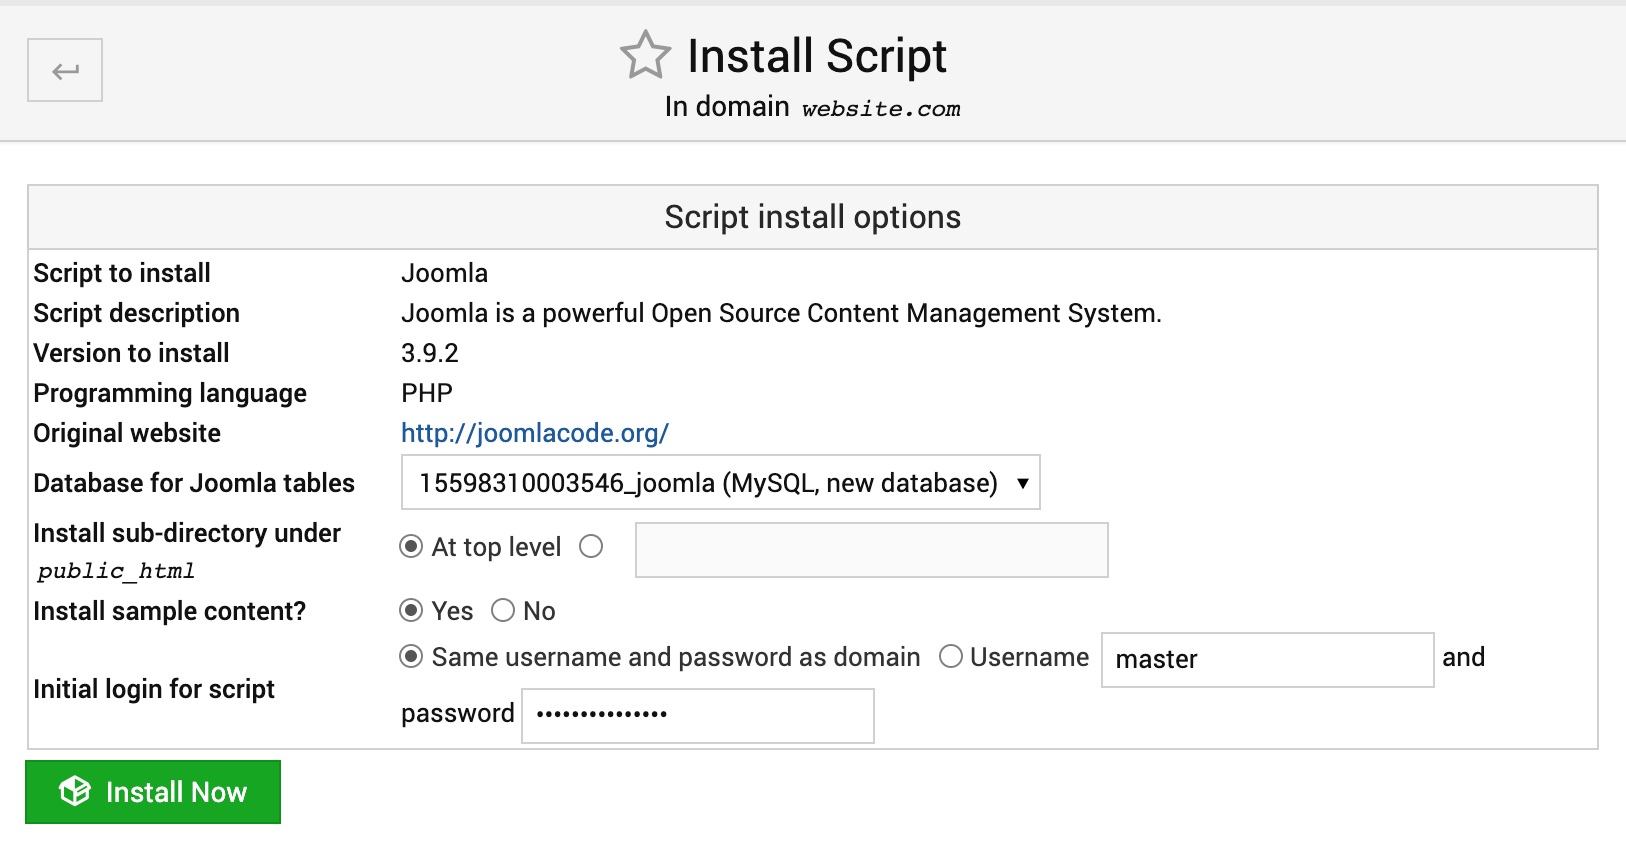
Under the Script install options some non-configurable meta information is given about the script such as - Script to install, Script description, Version to install, Programming languages, Original website.
You may safely leave all other configurable settings such as - Database for application, Install sub-directory under public_html, Install sample content? and Install login for script - with their default values intact and proceed to the next page.
Complete the installation
On the next page you will see the final warning question with some stats given:
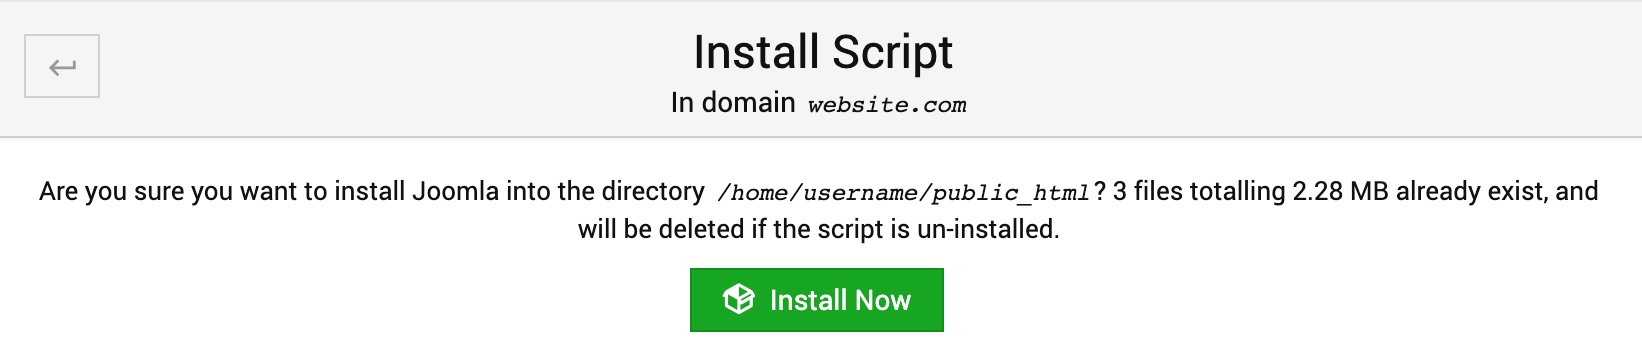
Click Install Now button and wait until the the installation process completes and outputs the log like below:
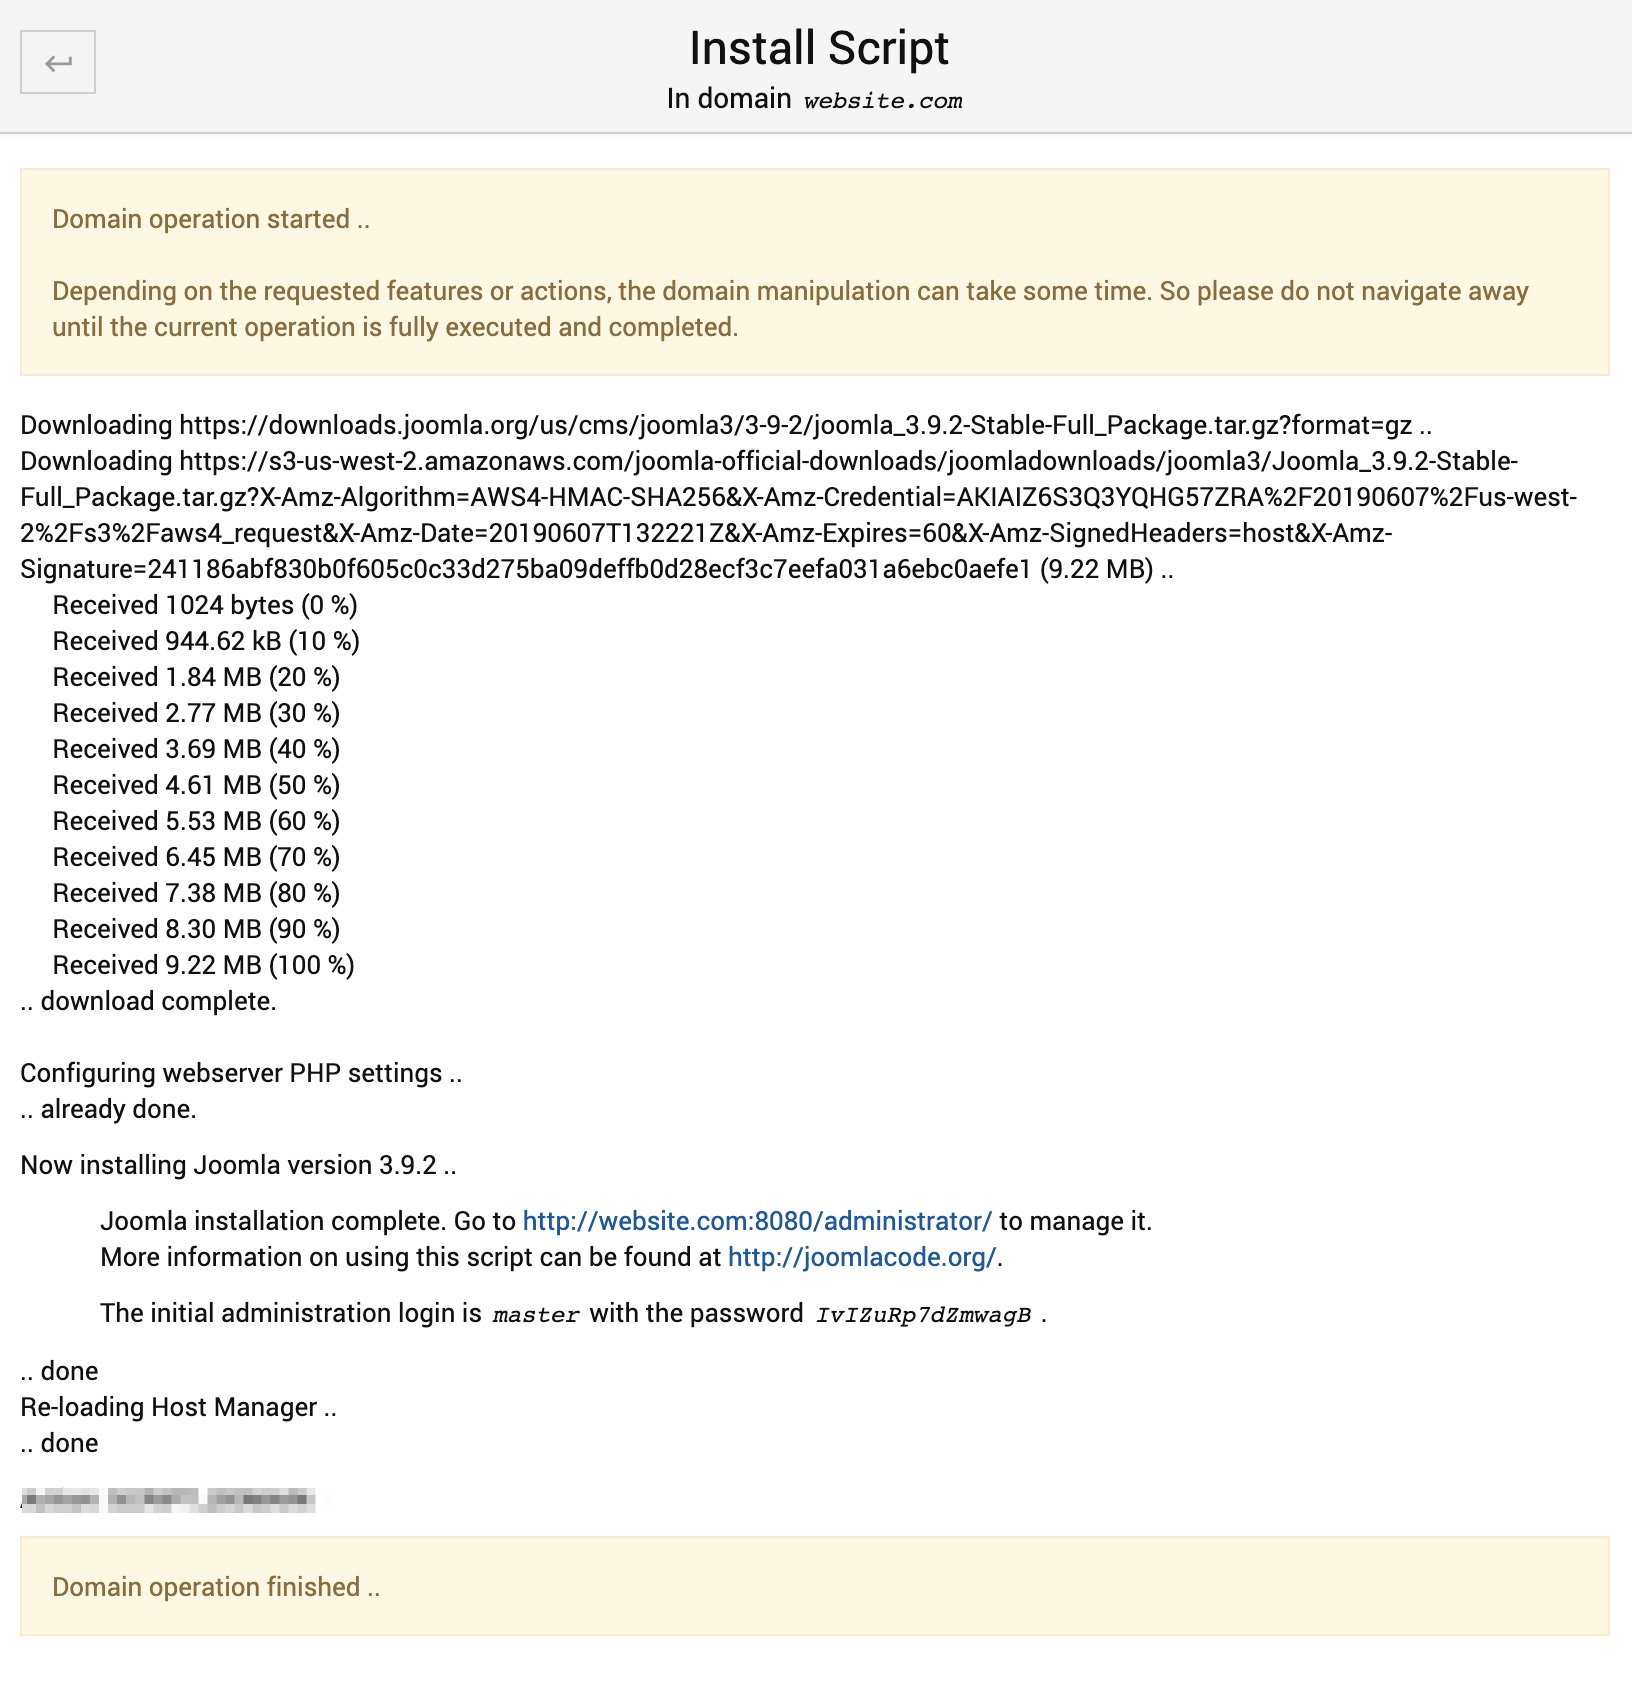
Now you can open your newly installed Joomla site via its' domain name in case if it's already resolving to your AltaGrade server or via your AltaGrade server's IP address in case if the domain name is not yet pinging.
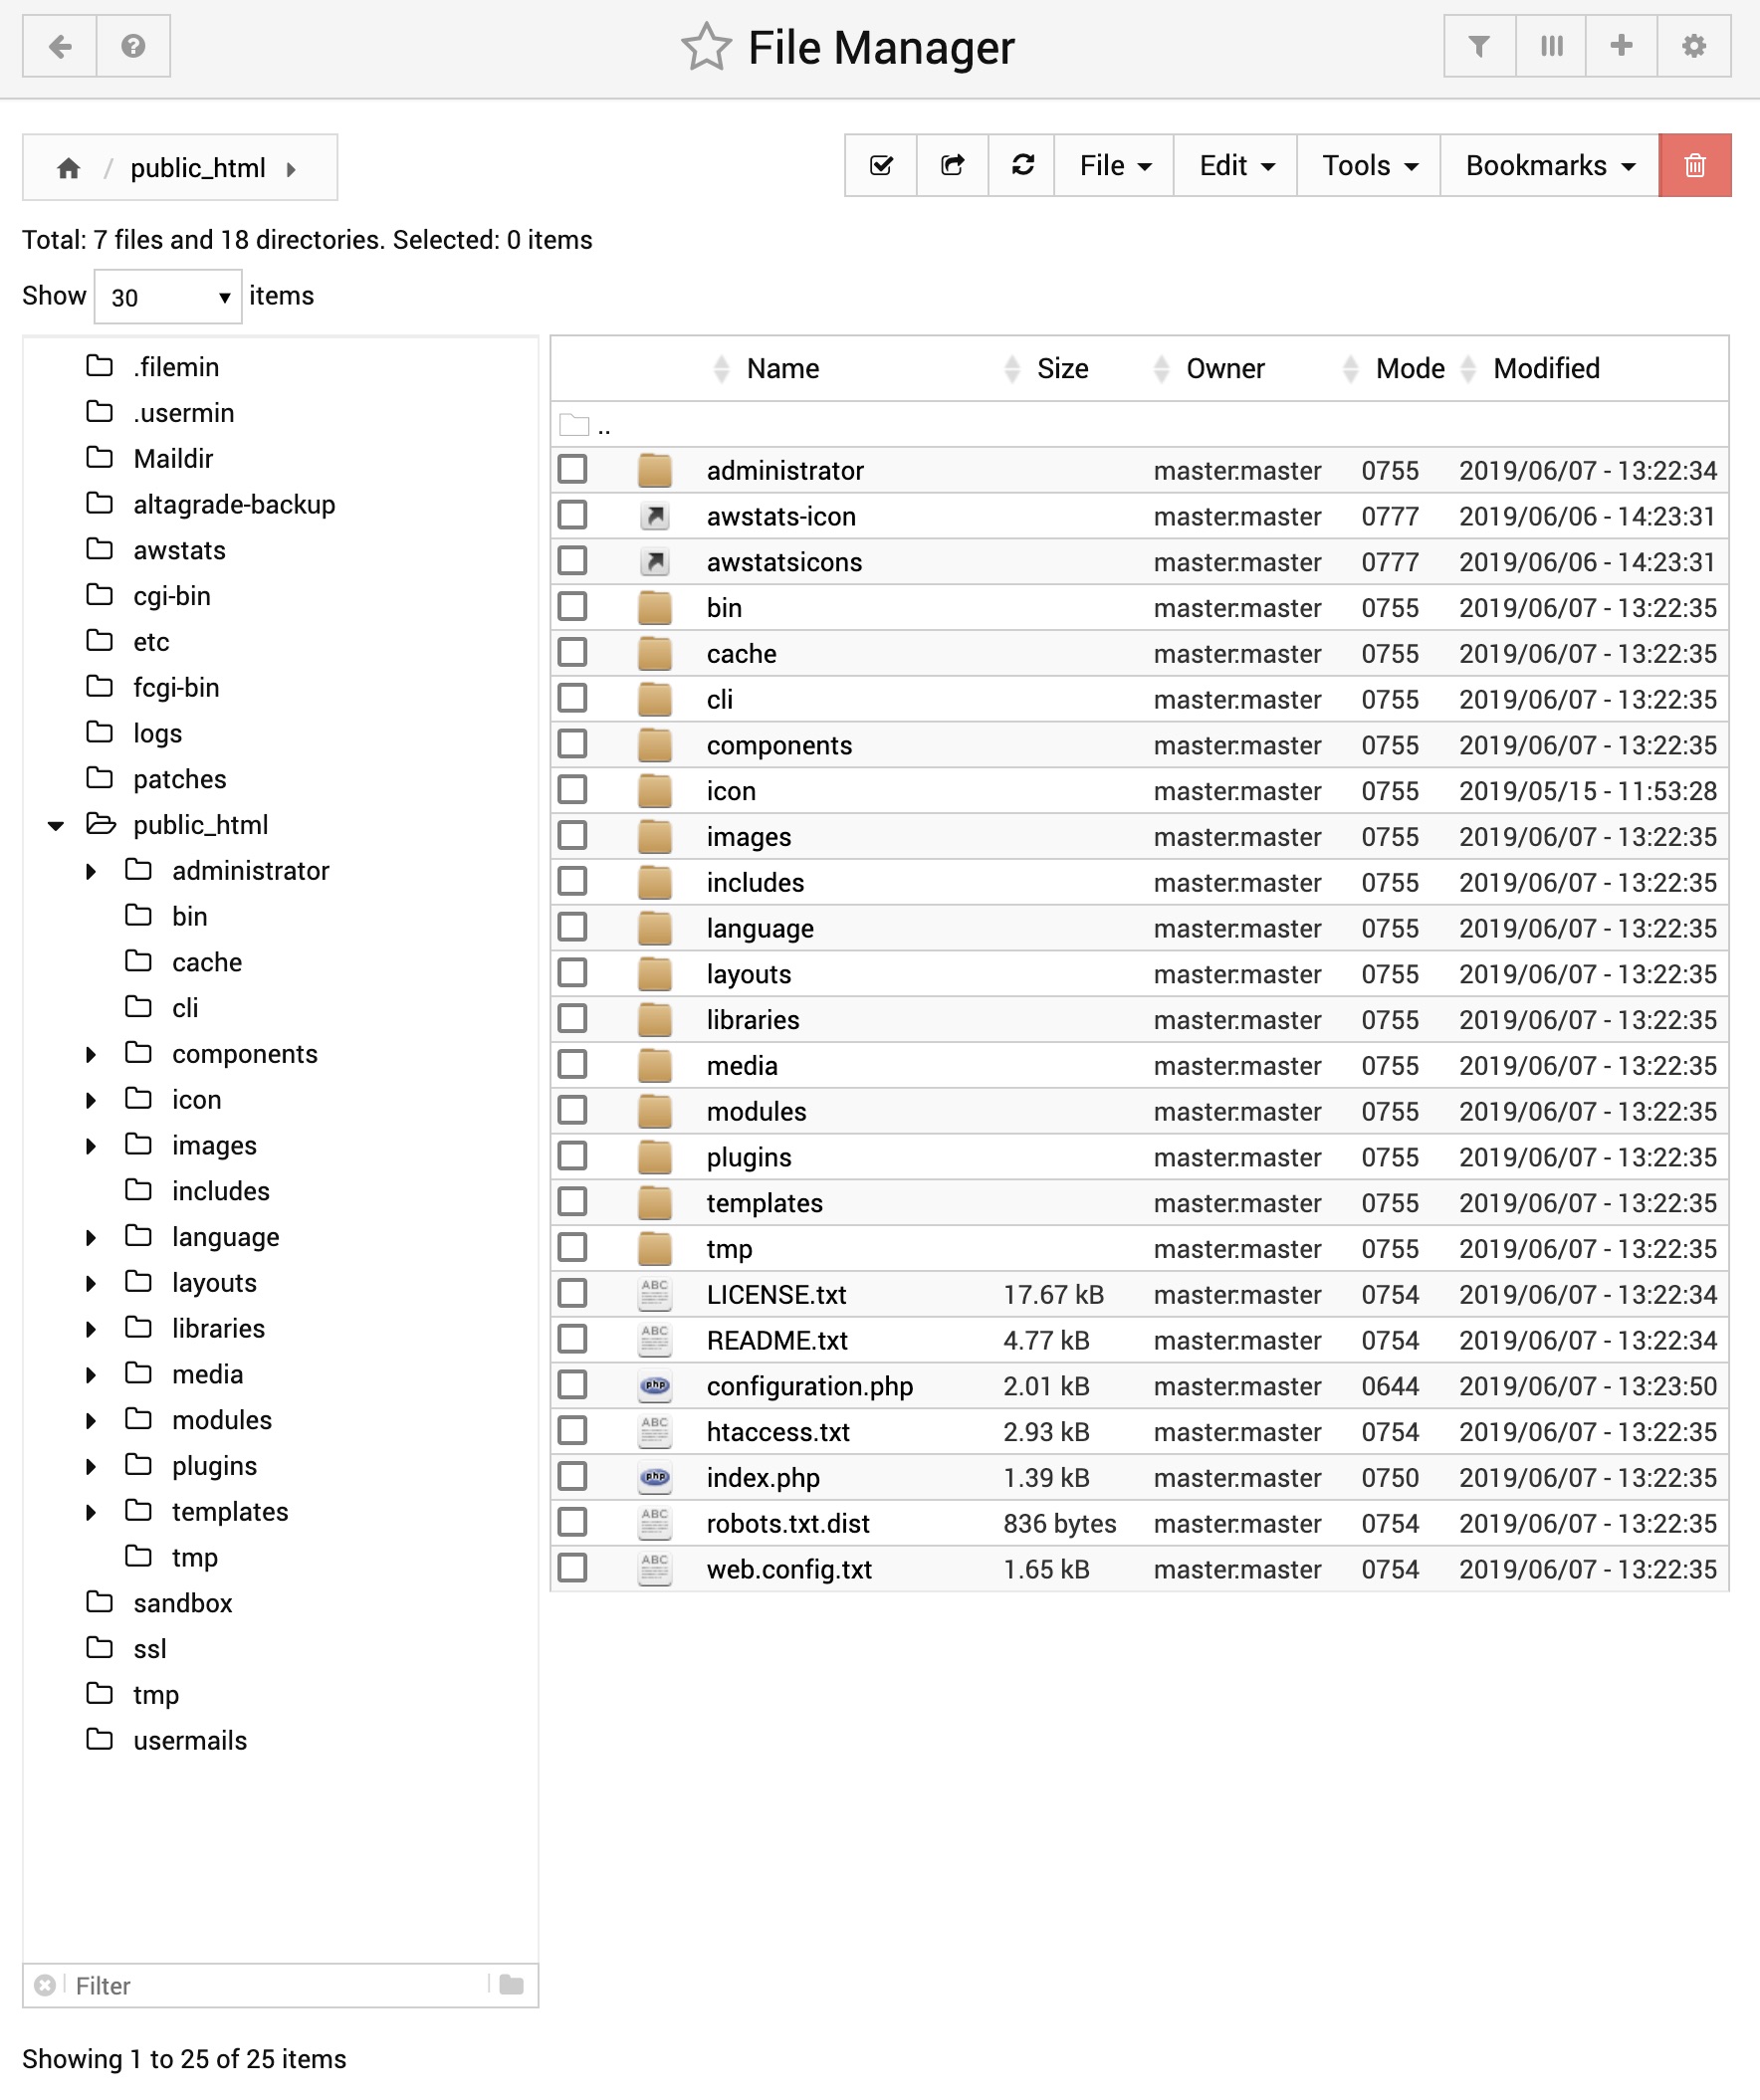
File Manager
At the top you will see a row of buttons similar to a toolbar. Below that is a list of files and directories that are in the current directory.
Navigating directories, viewing and editing files, renaming files
When you first load the file manager, you will see the contents of the root directory on your system, or the user's home directory, depending on who you are logged in as. To enter another directory, just single-click on it in the list. To go back up a directory, click the left arrow at the top-left of the file manager.
The contents of any file on your system can be displayed and edited by clicking the Edit icon under the Actions column.
If you want to download a file from your AltaGrade server to the computer that your browser is running on, just click the file name.
To rename a file or directory, click the Rename icon under the Actions column.
Moving and Copying files
The File Manager allows you to rename, move and copy files. To select the file that you want to manipulate, just click the checkbox to the left of it.
To move files to a different directory, select one or more and click the Cut button on the toolbar. Then navigate to the destination and click the Paste button. If a file with the same name already exists, the system will prompt you to rename the pasted file to avoid the clash. If you choose not to rename, the file in the destination directory with the same name will be overwritten.
To copy files, select them in the right-hand pane and click the Copy button. Then go to the directory that you want them to be copied to, and click Paste. As when moving files, you will be prompted to rename any that clash with files that already existing in the destination directory. Multiple copies of a file can be made by pasting in different directories. To create a copy of a file in the same directory, just select it and hit Copy and Paste, and enter a new filename.
You can delete one or more files and directories by selecting them and clicking the Delete button on the toolbar. Before they are actually removed, a confirmation window listing all chosen files will be displayed. When the Delete button in the window is clicked, all chosen files, directories and their contents will be permanently deleted.
A single file can be renamed by selecting it in the right-hand pane and clicking the Rename button on the toolbar. This will bring up a window containing the current filename and a text box for entering a new name. If the new name is the same as an existing file in the same directory, it will be overwritten when the Rename button in the window is hit.
Creating files
The File Manager offers two methods for creating new files - you can either create a text file from scratch, or upload data from the host that your web browser is running on. To create a new empty text file, click File then Create File. This will bring up a window in which you can enter the filename.
To upload a file from the PC your browser is running on, click File then Upload File on the toolbar. This will open a dialog window where you can choose the file to upload. When you are ready, click the Upload Files button to have the file(s) sent to your AltaGrade server. Once the upload is complete, the directory list will be updated to show the new file.
You can also retrieve a file from a remote URL. To do that, click File then Get from URL. There, you can enter the URL where your document is remotely hosted, as well as an optional username and password.
Editing file permissions
Each file or directory on a Unix file system is owned by a single user and group, and have a set of permissions that determines who can access it. Normally these are changed by the chown and chmod commands, but you can edit them in the file manager as well. To do this, select a file or files from the right-hand pane and click Tools then Chmod Selected or Chown Selected in the toolbar. This will bring up a permissions window.
In the Chmod window, you can select the appropriate read, write, and execute permission for the file(s).
In the Chown window, you can select the user and group you want as the owner for that file or directory.
If you want, you can tell it to apply the permissions recursively if you have selected a directory. Just be careful when using that option not to apply the permissions to files you didn't mean to give them to!
Finding files
The file manager can be used to search for files or directories on your system that match certain criteria. This can be useful if you know the name of a file but not the directory it is located in. To search for files, click on Tools in the toolbar, then click 'Search' to bring up the search window. In the Search query field, enter a search pattern to look for. This can be something like *.txt or foo?.c.
Bookmarks
It is possible to bookmark folders, so that future access to that folder can be done quickly.
To bookmark a folder, use the File Manager to browse to that folder, then click Bookmarks then Bookmark Current Folder in the toolbar.
To access the bookmarks later, click Bookmarks, and you will see the bookmarks you created at the bottom of the menu.
Administration Options
Under the Administration Options menu you will find links to the pages which allow managing the storage space usage on your AltaGrade server's disk, the excluded directories and databases, the list of sub-domains, the extra admins and re-sending the sign up e-mail.
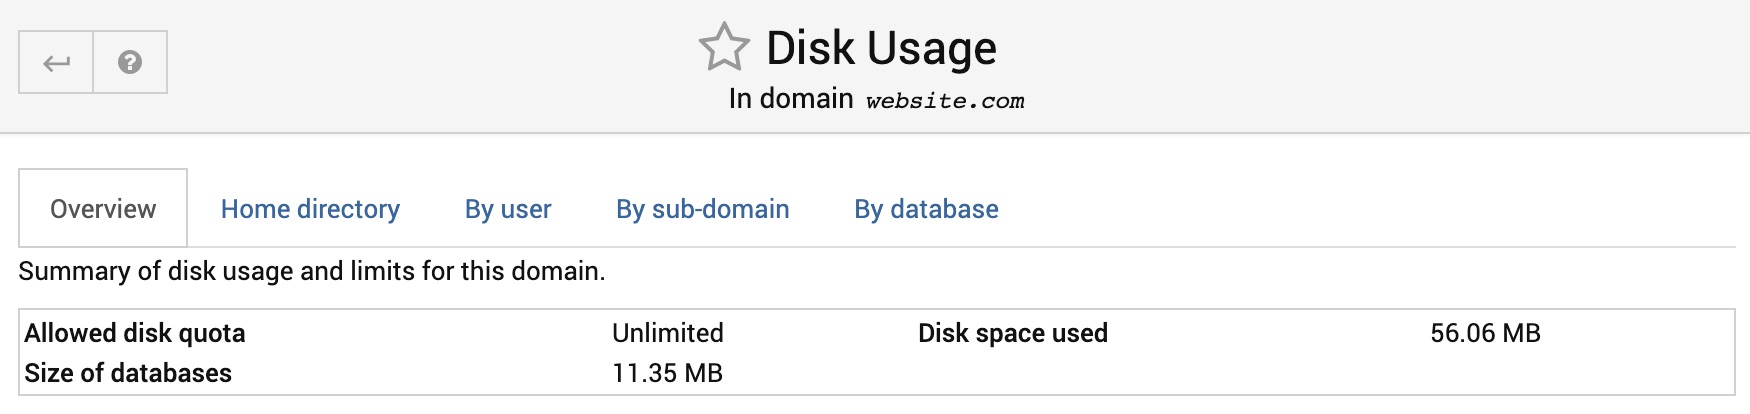
Disk Usage
This page displays disk usage for a virtual server, broken down into five tabbed sections:
Overview
This section shows the disk quota allocated to the virtual server, the space currently used by files owned by the server, and the size of owned databases.
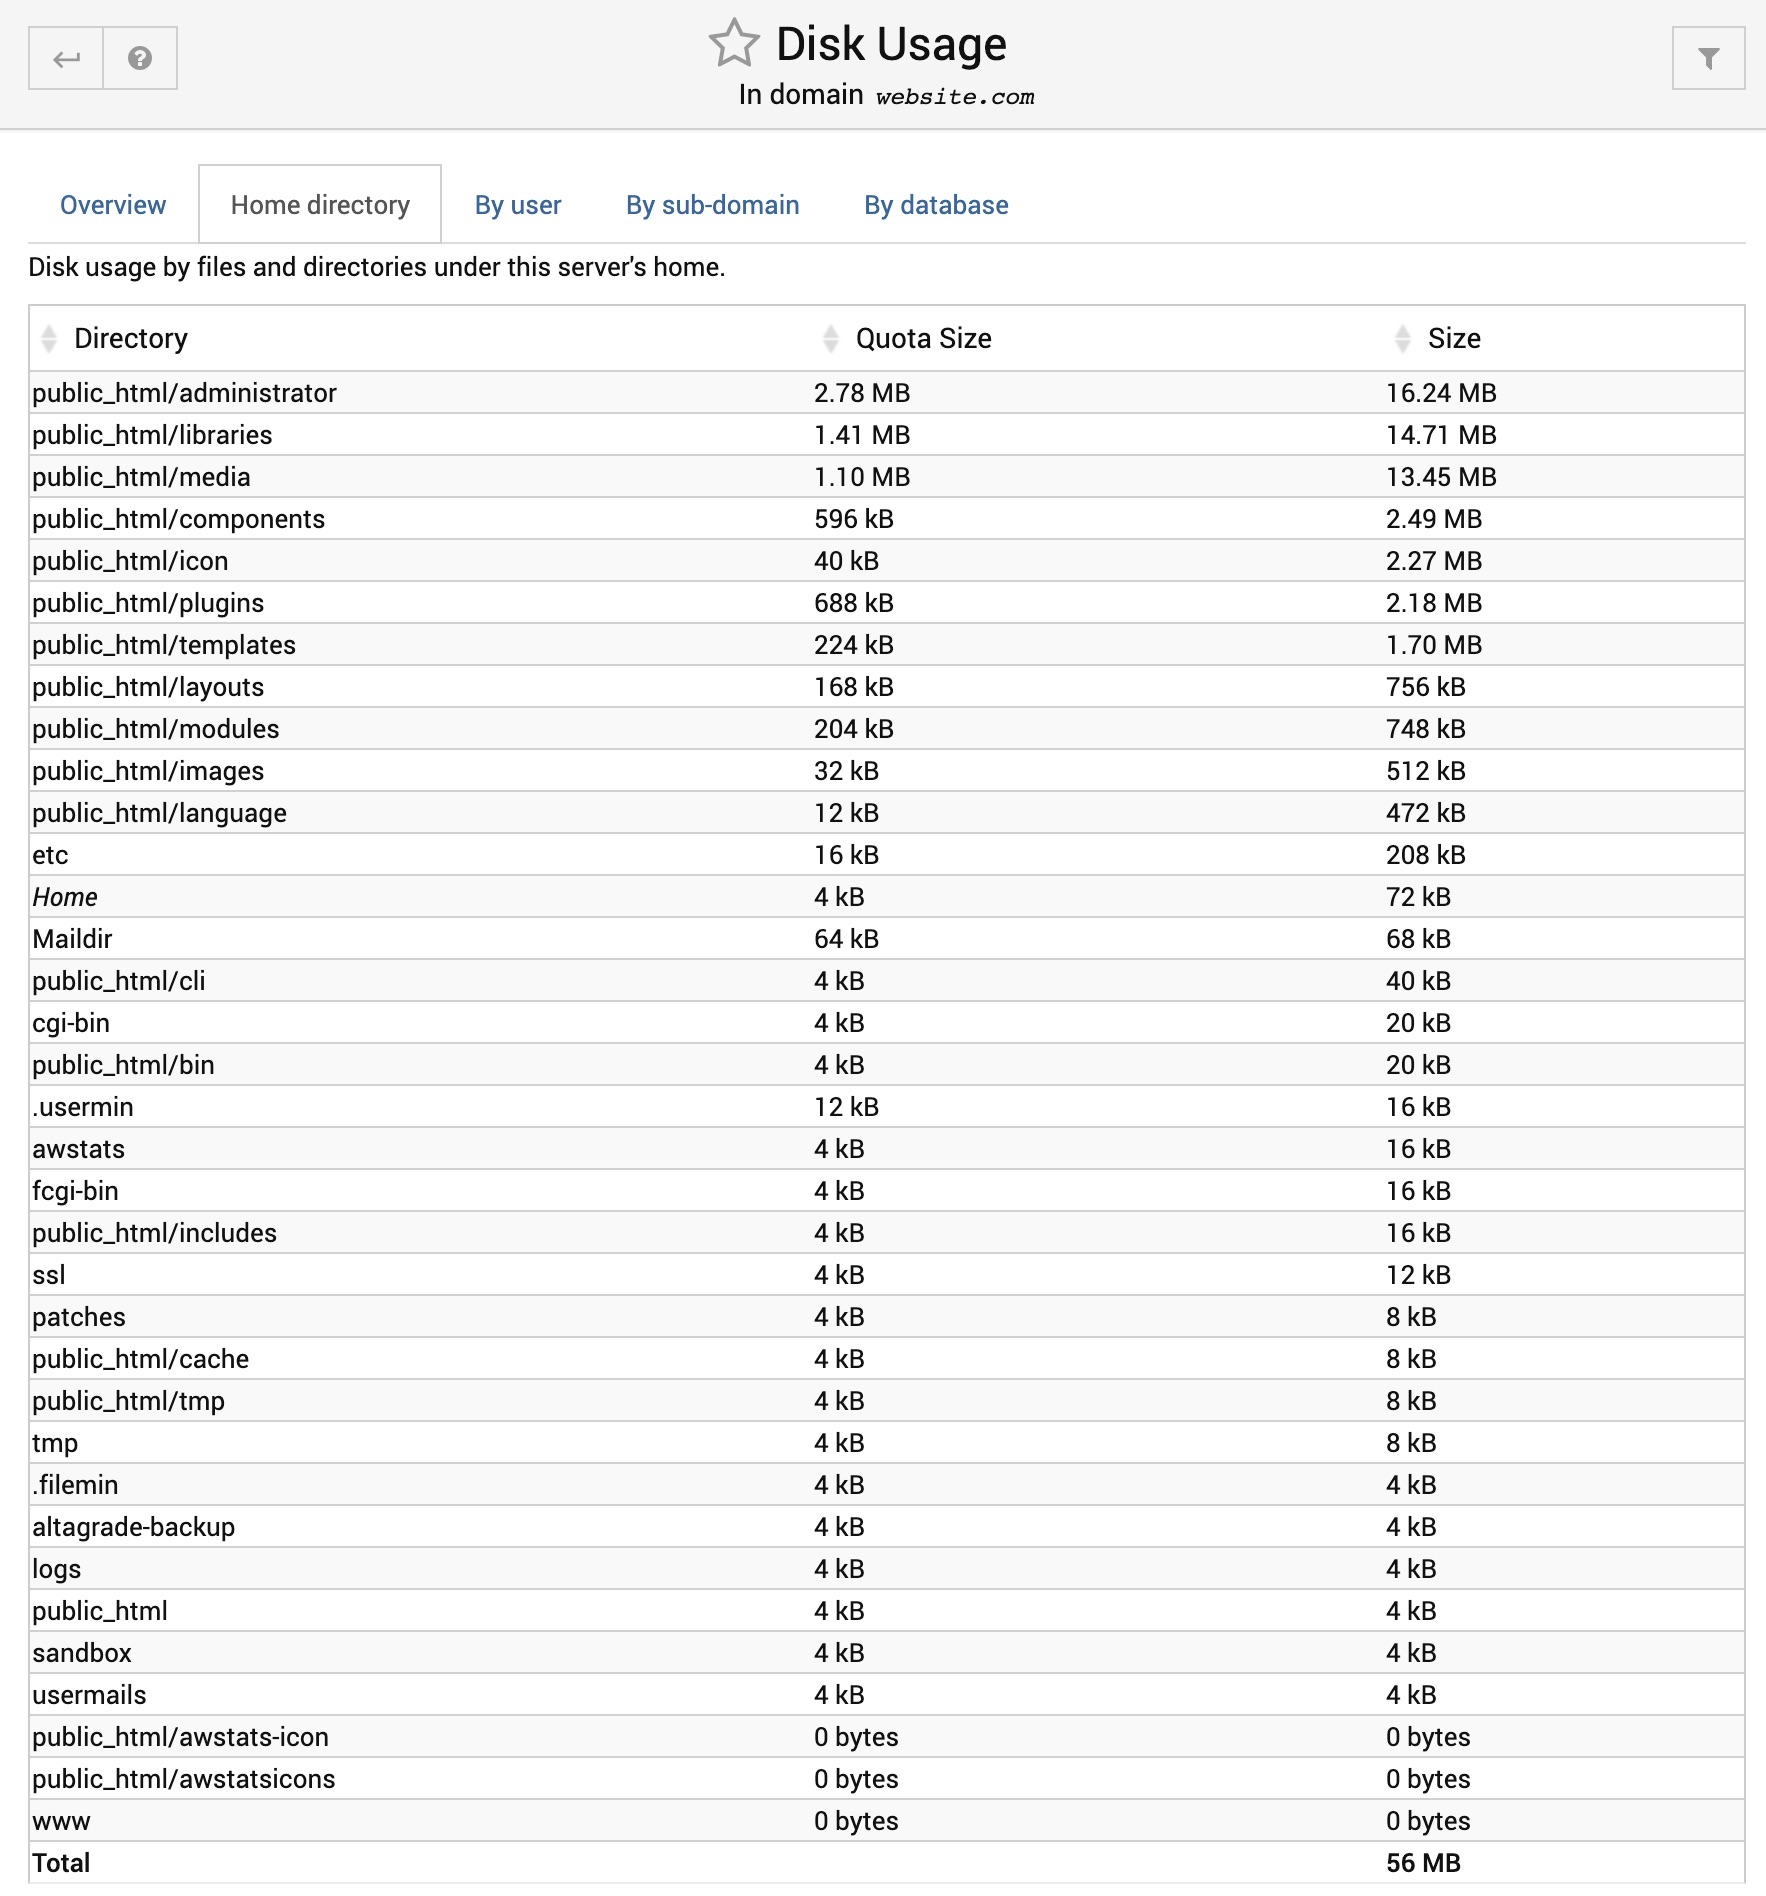
Home directory
Shows the space used by the top 10 directories under the server's home. For each, the Quota Size is the size of files owned by the server's Unix group, while the Size includes files owned by other users. The latter may be larger for directories like logs when have files owned by root. The homes directory which contains mail / FTP users is not included, as it is accounted for in the next section.
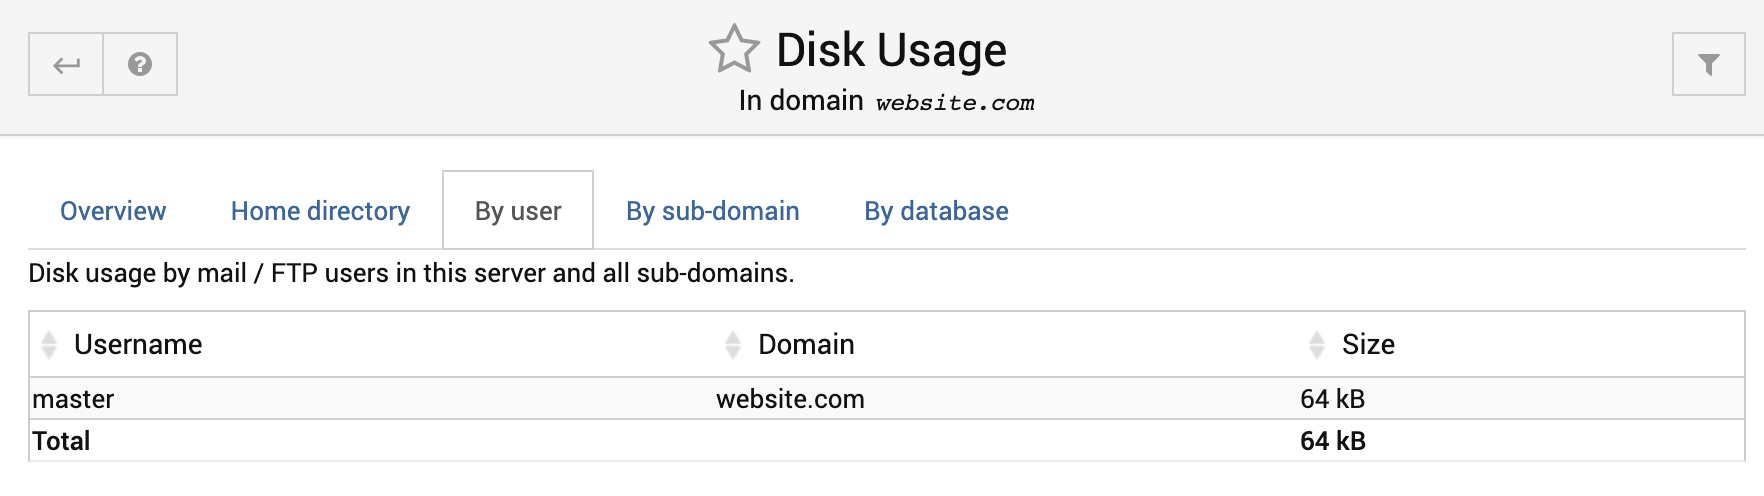
By user
This section shows the disk space used by the top 10 mailbox users in this domain and any sub-servers. Usage is based on files owned by the Unix user for each mailbox.
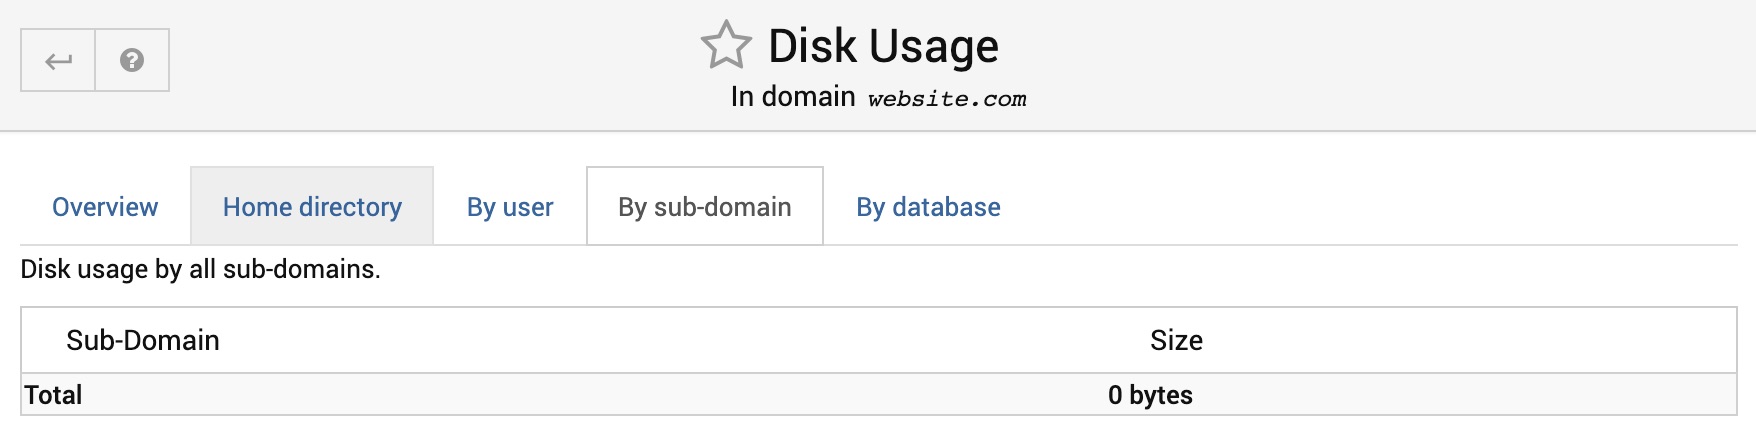
By sub-server
Shows the disk space used by each sub-server, based on the files in their home directories. The space used by any mailbox users in those servers is also included.
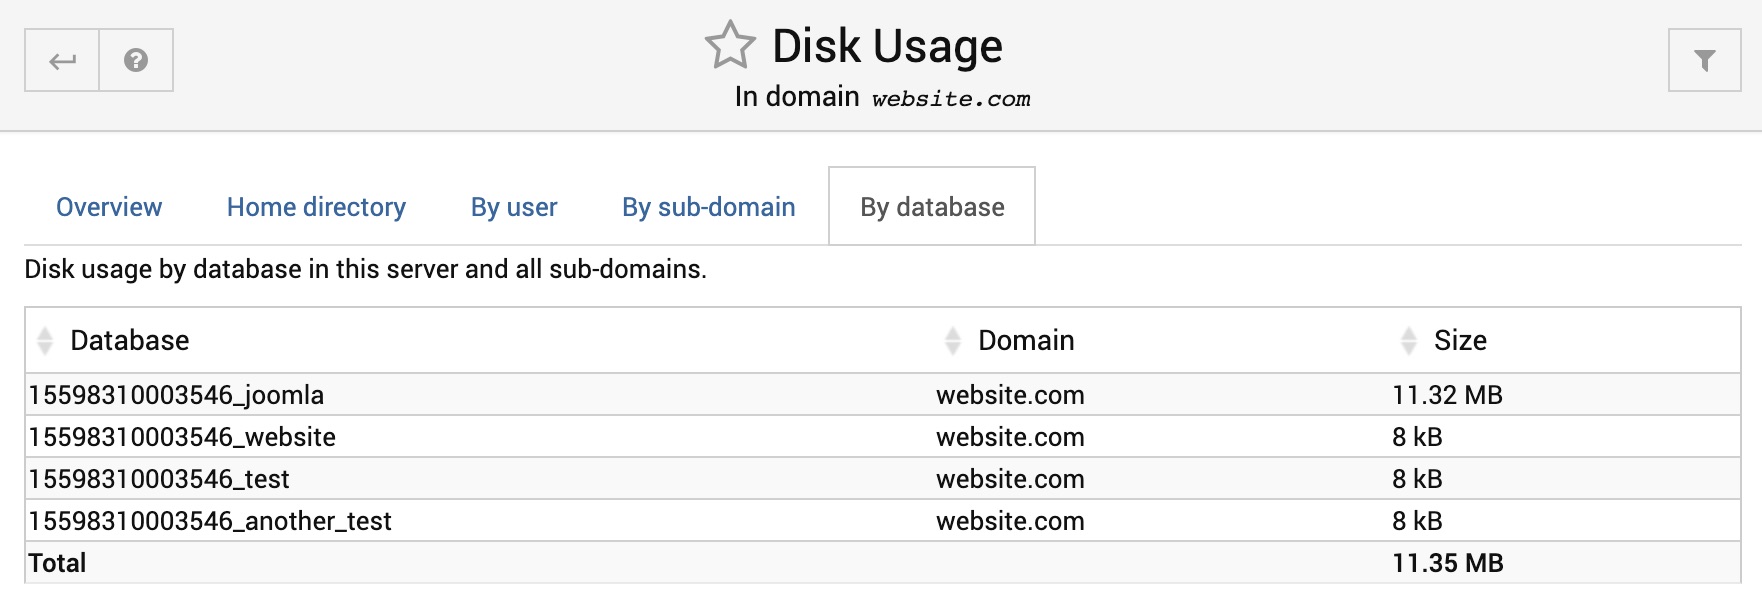
By database
Shows the disk space used by each MySQL or PostgreSQL database in this virtual server or any sub-servers. Only the top 10 databases are shown.
Excluded Directories and DBs
By default, Site Manager will include all data in a website's home directory when making a backup. However, if a website has files that are too large to include or are backed up via some other method, this page can be used to exclude them from backups.
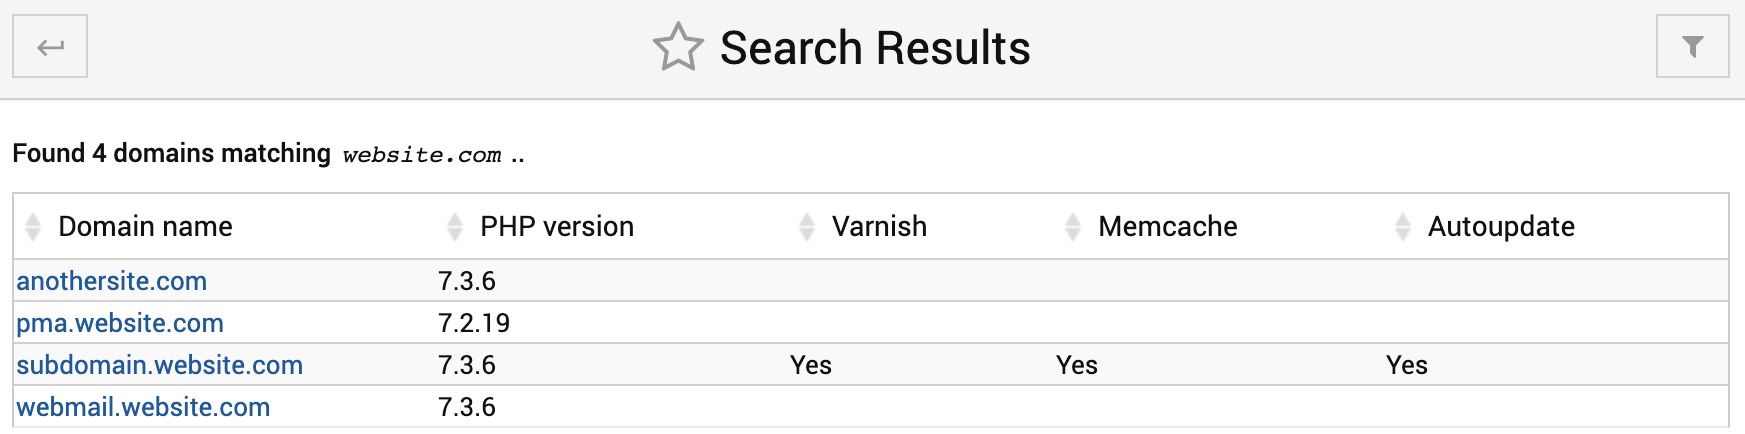
List Sub-Domains
This page lists all the websites hosted on a non-reseller AltaGrade server, including standalone websites, which are not sub-domains of the master website. On a reseller AltaGrade server this page lists only the actual sub-domain websites.
Also, you can see the PHP versions set for each website and if Varnish, Memcache and Autoupdates features are turned on or off.
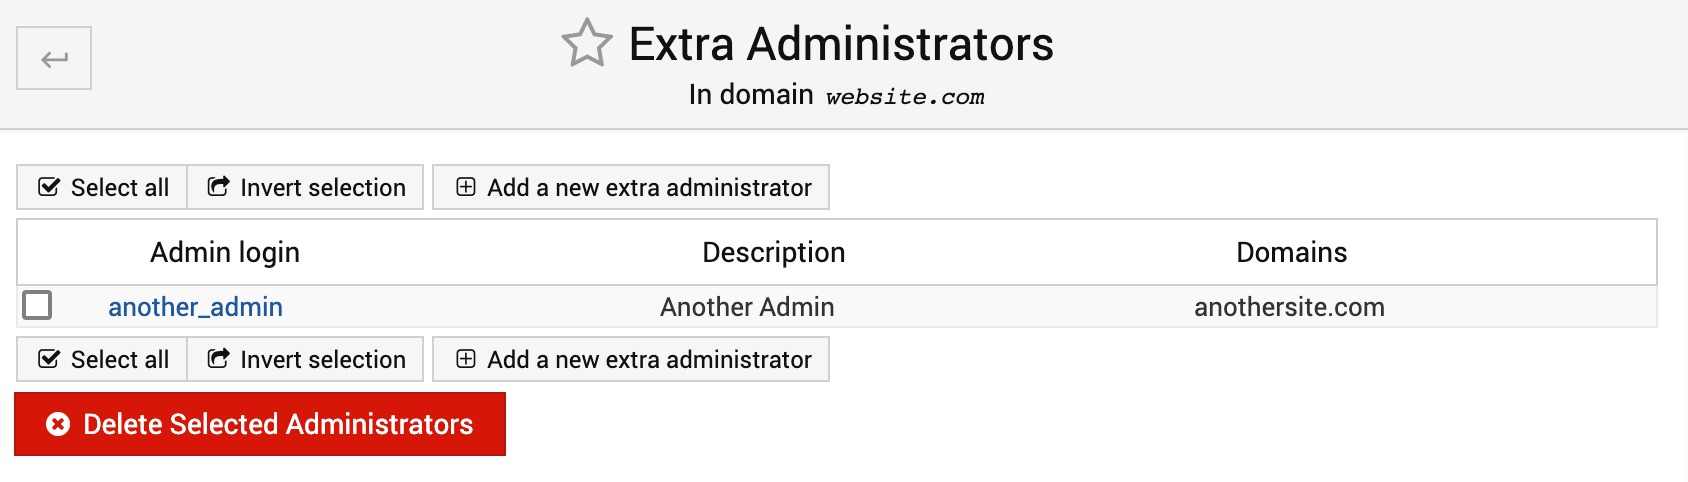
Manage Extra Admins
This page lists all the additional administrators on the server. Note, that each administrator can have his/her own permissions.
Clicking on the Add a new extra administrator button opens the form on the next page that looks like:
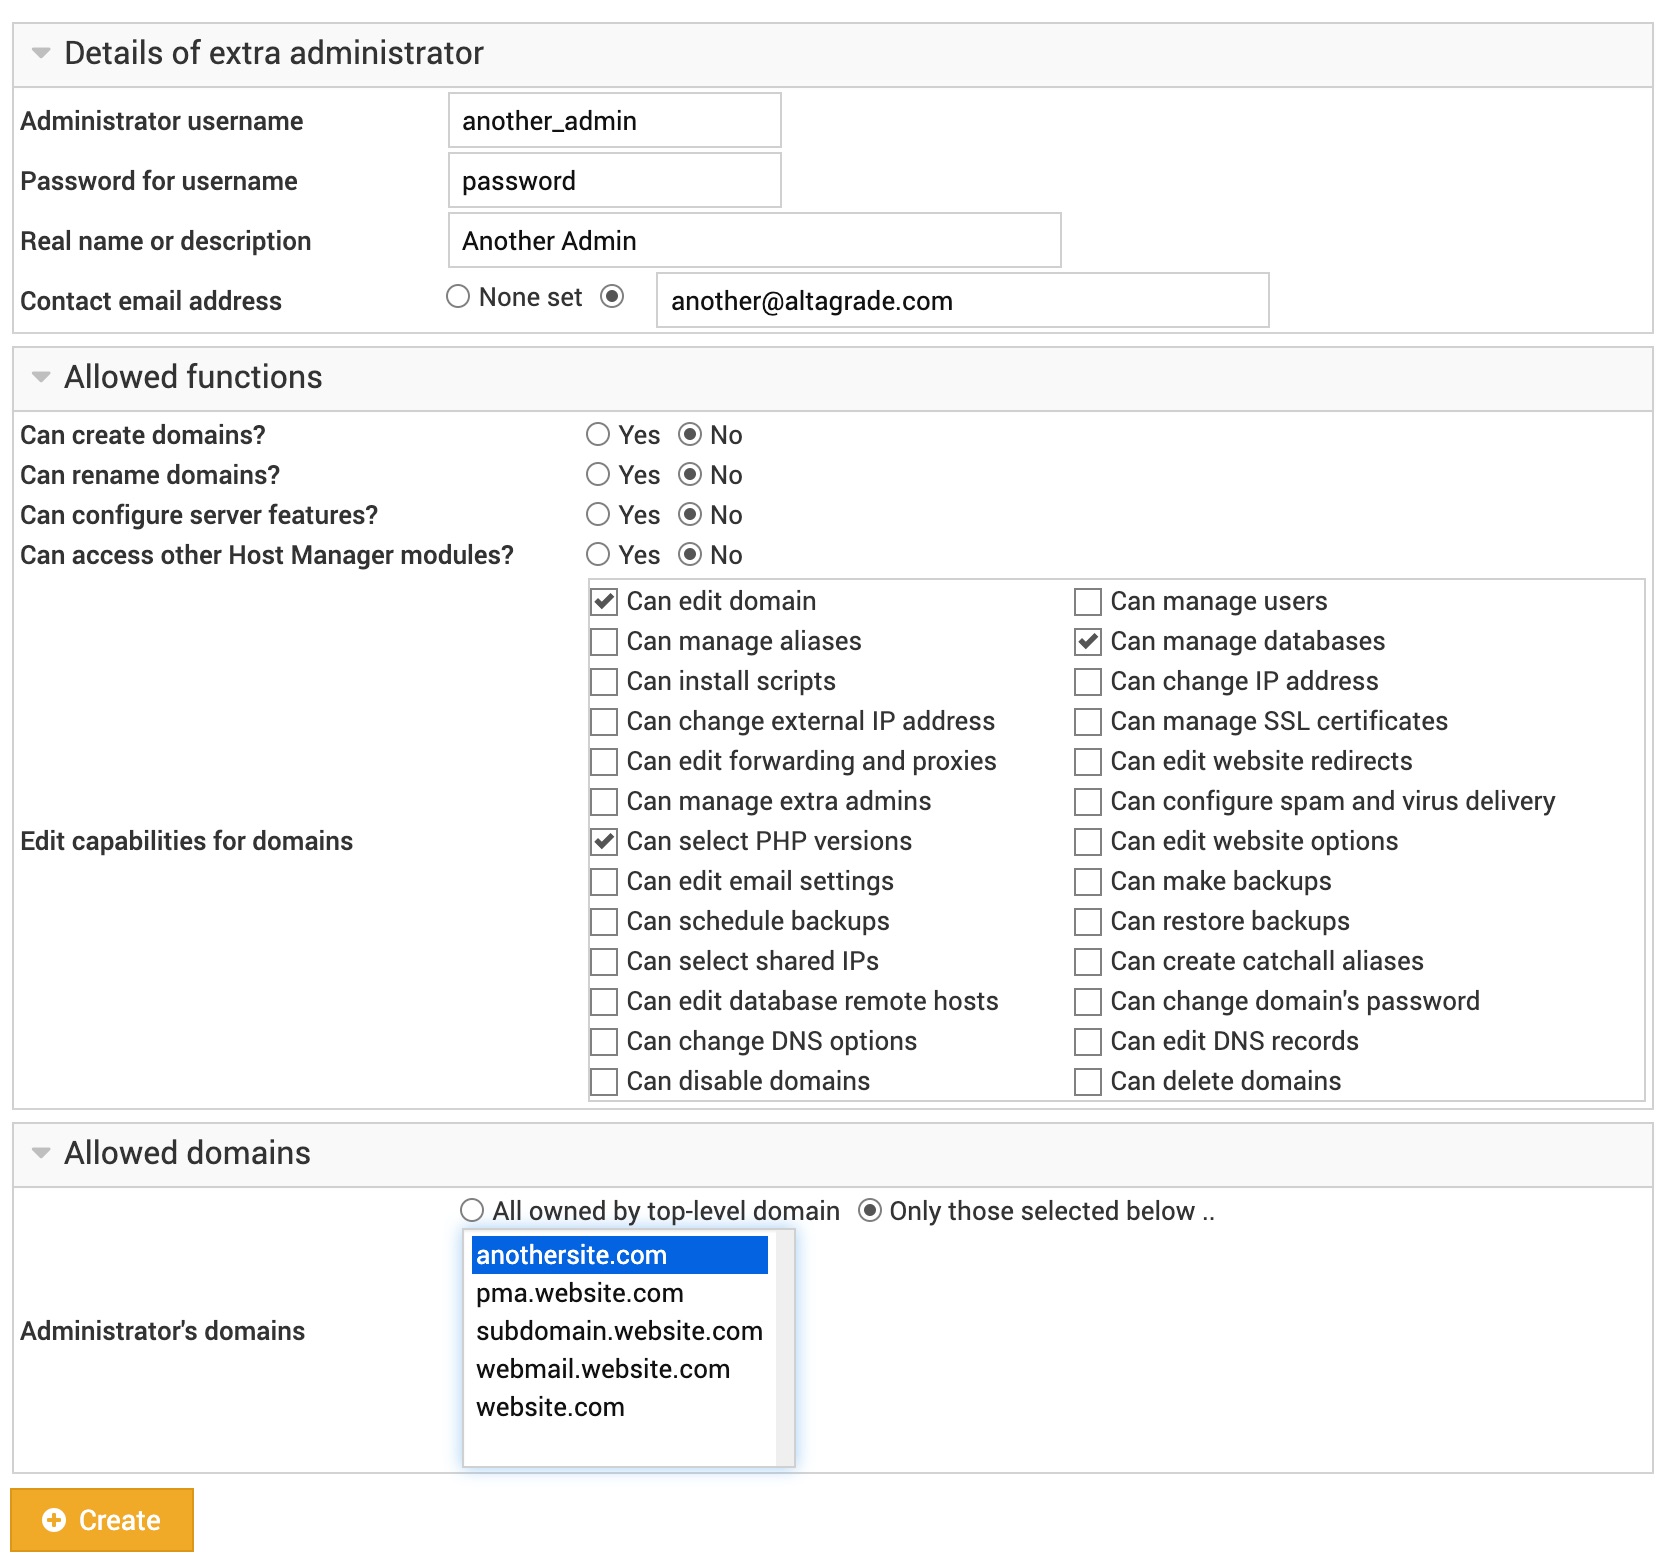
Fill in the form to create a new administrator with the following options divided into three categories:
Details of extra administrator
Administrator username
The username that the extra administrator will use to login. This account name has the same restrictions as any other account on the system (i.e. no spaces, and no special characters other than those allowed in usernames).
Password for username
The password the administrator will use to login to the control panel.
Real name or description
This is a free text field and can contain spaces, though some special characters are not allowed, specifically.
Contact email address
This field can be used to enter an address to contact the person who owns this extra administrator account. This address may also be used when the master administrator sends email to all domain owners.
Allowed functions
Can create domains?
This option determines whether or not the extra administrator is allowed to create new domains. Regardless of the setting here, he will not be allowed to create domains if the server owner is not permitted to.
Can rename domains?
This option determines whether or not the extra administrator is allowed to rename domains. Regardless of the setting here, he will not be allowed to rename domains if the server owner is not permitted to.
Can configure server features?
This option determines if this extra administrator can manage settings related to this virtual server, such as its Apache configuration, DNS records, mailing lists, and so on.
Can access other Host Manager modules?
This option determines if this extra administrator will be granted access to Host Manager modules not directly related to the domain, such as those for changing passwords, reading email and switching themes.
Edit capabilities for virtual servers
These checkboxes control exactly which virtual server capabilities this extra administrator can manage. You may want to disable some in order to create an administrator who is limited to a specific task, such as alias management.
Allowed domains
Administrator's domains
This field allows you to select which virtual servers this extra administrator is allowed to manage. By default he will be able to configure all those owned by the parent domain, but a smaller subset can be selected here if desired.
Re-Send Signup Email
If you are looking for the access information to your AltaGrade server, then please follow steps described for AltaGrade Dashboard > Access Information instead. If you are looking for ways to connect to your AltaGrade server via SSH, SFTP, Git or Drupal Drush, then go to Tutorials > Connect to AltaGrade server instead.
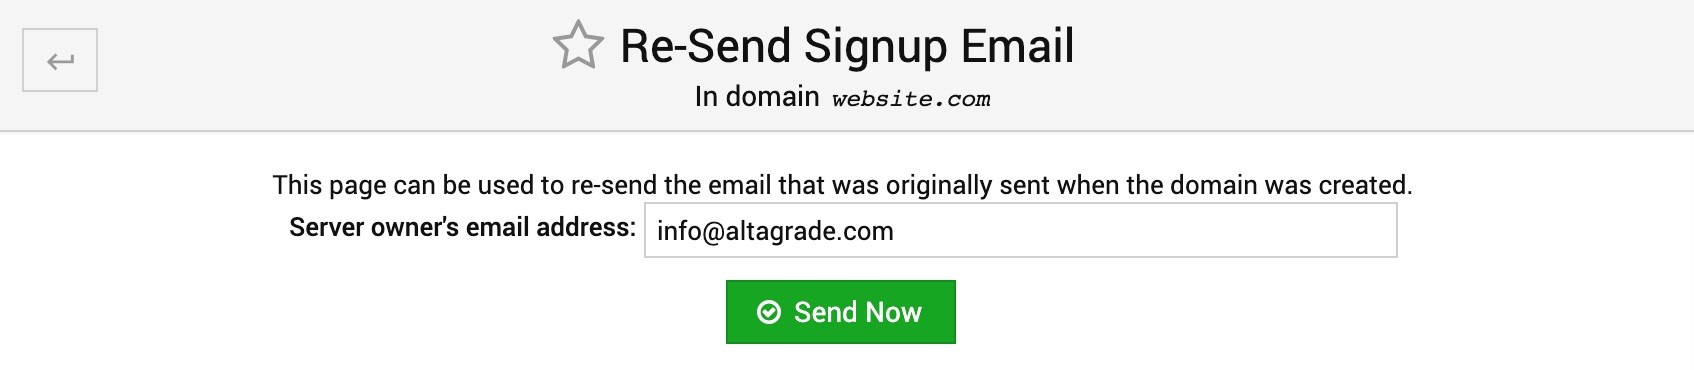
However, if you'd like to receive the detailed information about your website, then use the form on this page by placing your e-mail address and clicking on the Send Now button to receive an e-mail, that will contain the following table:
+=============================================+
| Website Info | website.com
+=============================================+
| Username: master
| Password: ****************
| Website: http://www.website.com

| HTML directory: /home/username/public_html
| SMTP server:             mail.website.com
| POP3 server:             mail.website.com
| MySQL database: 15598310003546_website
| MySQL login: master
| MySQL password: ****************
| Apache Solr Host: localhost
| Apache Solr Port: 8983
| Apache Solr Path: /solr/website.com
+=============================================+

+=============================================+
| Server Info | 66.39.46.114
+=============================================+
| Dedicated IP: 66.39.46.114
| SSH and SFTP Port: 574
| Control Panel: http://admin.website.com
| (or https://66.39.46.114:10000 before propagation)
+=============================================+
Domain Configuration
The Domain Configuration menu block features all the important functions with regard to managing your domain such as changing domain names or password, managing extra admins and setting up SSL certificate.
Clone Domain
This page allows you to duplicate an existing websites with a new domain name. Any web content, DNS records, mailboxes, mail aliases, databases and other settings associated with the original domain will be duplicated.
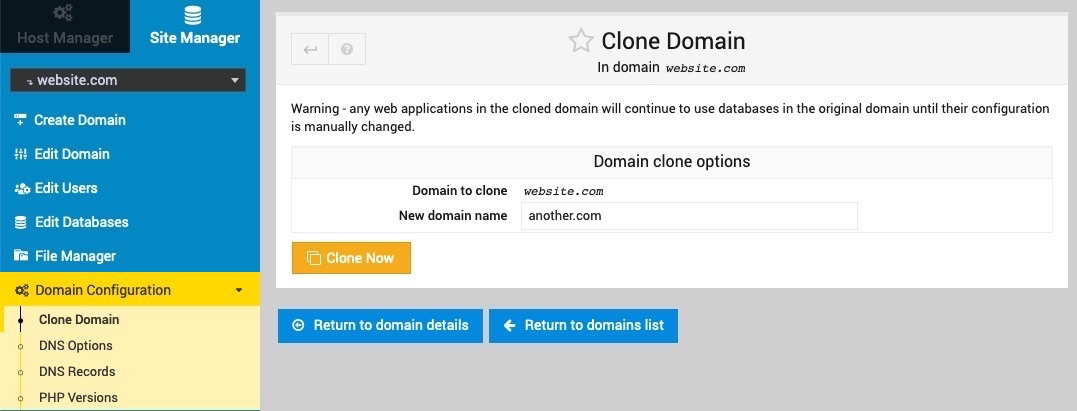
The cloning process will copy any databases associated with the original domain under new names, and duplicate their contents. However, it will NOT update any scripts installed into the original domain that are configured to use the original databases - this must be done manually.
Change Domain Name
The form on this page can be used to change the domain name of an existing virtual server. By default the username and home directory will also be adjusted to match the new domain, assuming that they are based on it.
It can also be used to change either the administration username or the home directory without touching the domain name at all, for example if you want to move to a new base directory. Only the master administrator can change the username or move the home to an artbitrary location though.
By default, existing mailbox users in the domain are not renamed so that their IMAP logins sitll work. You can force a change by setting the Change mailbox name suffix? to Automatically chosen though. This field can also be used to change the suffix to anything you want, even if the domain name is not changed.
If a domain is using [email protected] format for mailboxes, users will only be renamed if the actual domain name changes.
DNS Settings
DNS Options
This page is primarily for configuring the SPF (Sender Policy Framework) DNS record, which is used by other mail servers to ensure that email claiming to be from a mailbox in this domain actually was. This prevents spammers and worms from faking source email addresses, thus allowing them to be more easily blocked.
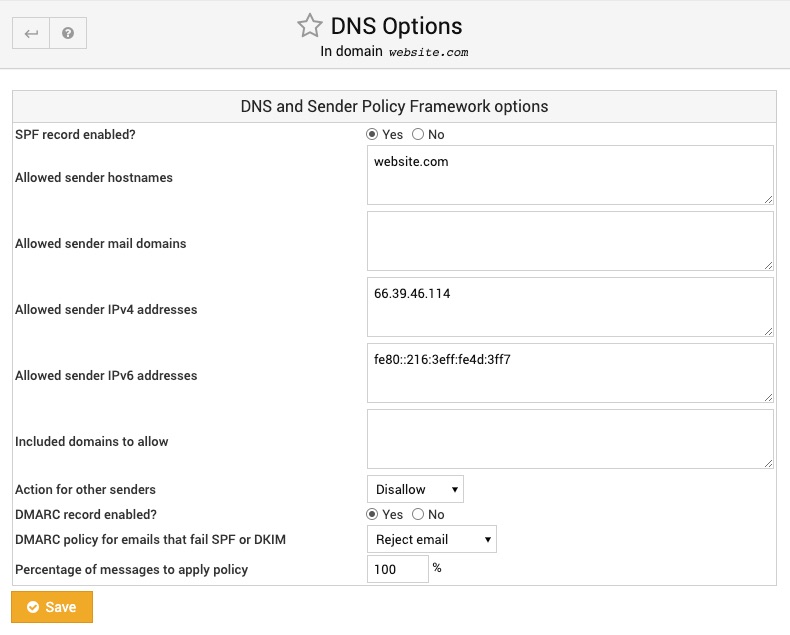
A domain's SPF record specifies the mail servers that are allowed to send email from that domain, and a policy to apply to other senders. Recipient servers can then lookup this record, and compare the address of the system sending email with the allow list for the sender's domain.
DNS Records
This page shows DNS records in the selected domain, and allows them to be created, edited and deleted. To change an existing record, simply click on its name. To add a record, select a type from the menu at the bottom of the list and click the Create Record button. To remove records, check the boxes next to their names and click Delete Selected.
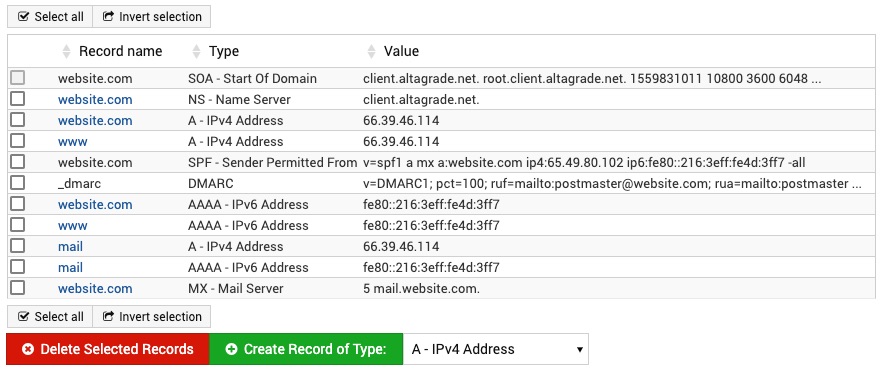
Not all records can be edited or deleted, such as the SOA record or TXT records automatically created for DKIM signing. Be careful editing existing records such as www or MX records, as this may break access to your domain's website or email delivery.
Edit Proxy Website
This form can be used to enable and configure the URL to which all requests to this domain's website are forwarded.

Web Configuration
PHP Versions
This page allows you to select the version of PHP used by default in this virtual server, and also to choose different versions for different web sub-directories. This can be useful if you have PHP applications that will only work with a specific version.
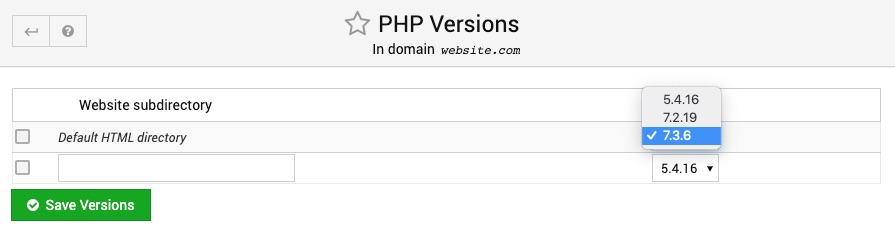
To change the version used by default, select it from the menu next to the Default HTML directory row, and click Save. Similarly, to change the version used by some other directory, select it from the menu next to that directory's row.
To add a custom PHP version for a new directory, enter its relative path into the text field at the bottom of the table, select a version from the menu at the bottom, and click Save. This path must be relative to public_html, like wordpress or mediawiki. There is no need for a leading / , or a full URL.
To reset a directory to use the default version of PHP, select the checkbox next to it in the table and click the Remove Selected button.
Website Options
On this page you can set various website and PHP options.
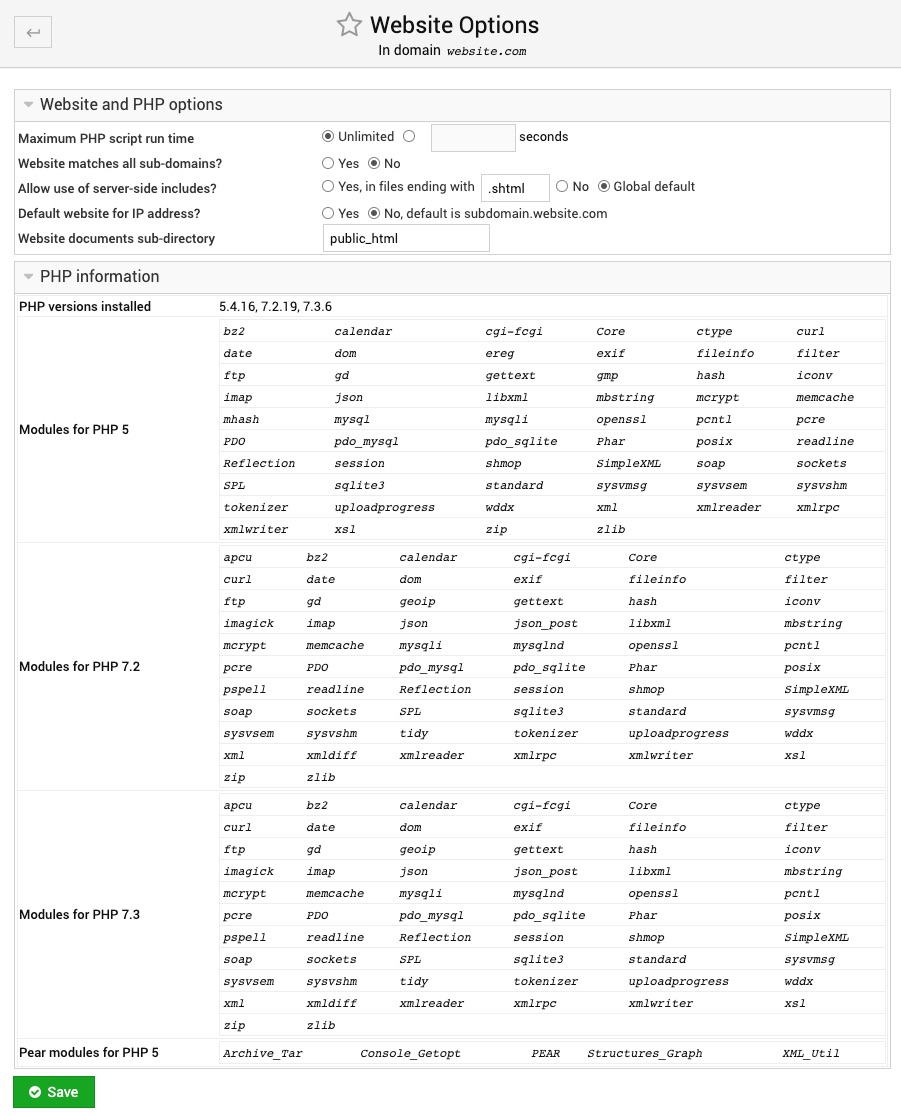
Maximum PHP script run time
When PHP scripts are run using FCGId mode, this field sets the maximum time each script call can run for. You may need to increase it when hosting scripts that have particularly high run times, and are being killed by your web server before completion.
Website matches all sub-domains?
When this option is enabled, requests for any URL under the domain (like http://abc.example.com) will return the virtual server's website. This can be useful if you host an application that can return different content based on the requested domain name, such as Drupal Multisite setup or WordPress MU.
If the virtual server's DNS domain is hosted on this system, Site Manager will also add the wildcard * DNS record when Yes is selected.
Default website for IP address?
When this field is set to Yes, this website will be served by Apache when it receives a request that doesn't match any other virtual server on the system. This typically happens if a user uses a URL with an IP address in it, or a hostname that resolves to your system but does not match any domain.
Website documents sub-directory
This field allows you to change a virtual server's sub-directory that contains web content from the default of public_html. This can be useful if you have created content or scripts in a directory under public_html and want to make it visible to users accessing your website's top-level URL.
PHP information
If you click on this field-set that is collapsed by default, then you will see various information regarding all PHP version installed on the server and installed modules for each of them.
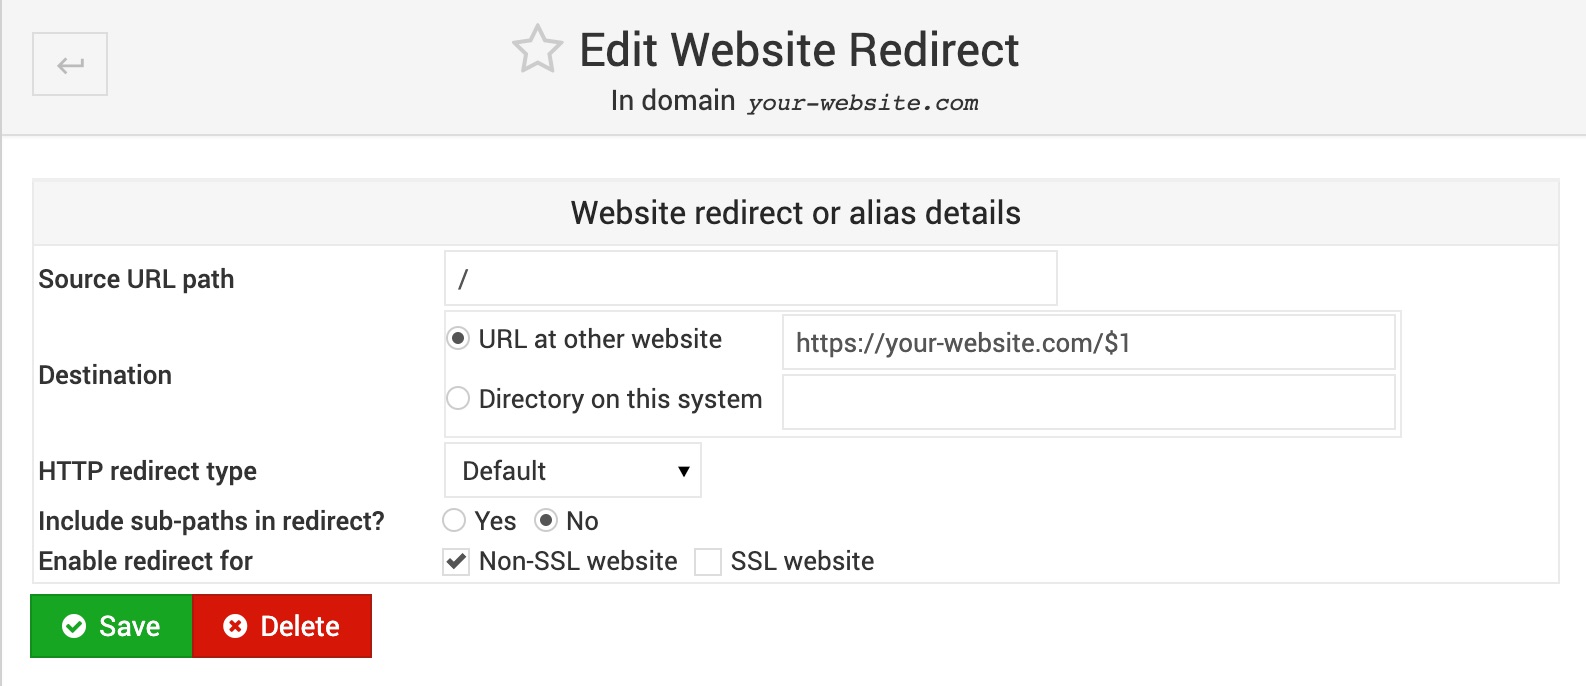
Website Redirects
To redirect a website at Apache Configuration level login to your control panel, select a website, click on Domain Configuration menu, then on Website Redirects submenu, then click on Add a new website redirect and fill all the required fields per your preferences.
For example, a proper redirection from HTTP version of your website to its HTTPS version should be configured as shown on the screenshot below:
Services
The Services menu block features links to such configuration pages as Configure Website, PHP Configuration for each version installed on the server, Preview Website and Protected Directories.
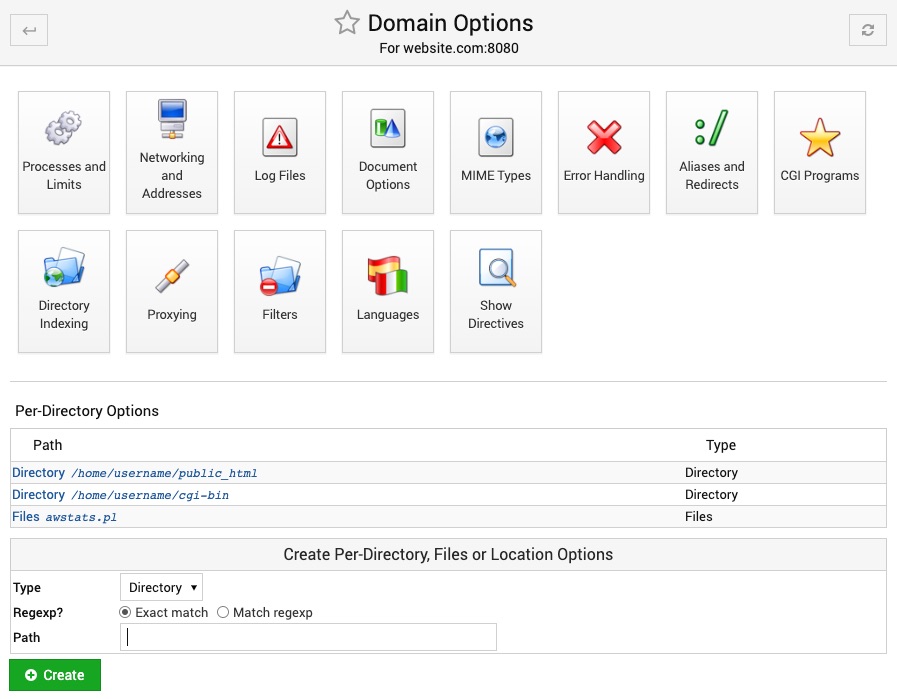
Configure Website
This page has many configuration settings such as - Processes and Limits, Networking and Addresses, Log Files, Document Options, Mime Types, Error Handling, Aliases and Redirects, CGI Programs, Directory Indexing, Proxying, Filters, Languages, Show Directories - which normally should be left intact, because AltaGrade tunes them well for you. Only if you are an advanced user and clearly know what you are doing, you can change these settings. We still request to let AltaGrade team know of what kind of changes in these settings you've done on your server.
PHP Configurations
As of June 8, 2019 PHP versions 5, 7.2 and 7.3 are installed by default on AltaGrade servers. This list can be extended with any other PHP versions upon customer request via AltaGrade Dashboard.
You can manage the following configuration pages for each PHP version: PHP Variables, Directory Settings, Database Settings, Session Options, Safe Mode Options, Resource Limits, Error Logging, Other Settings, Edit Configuration Manually.
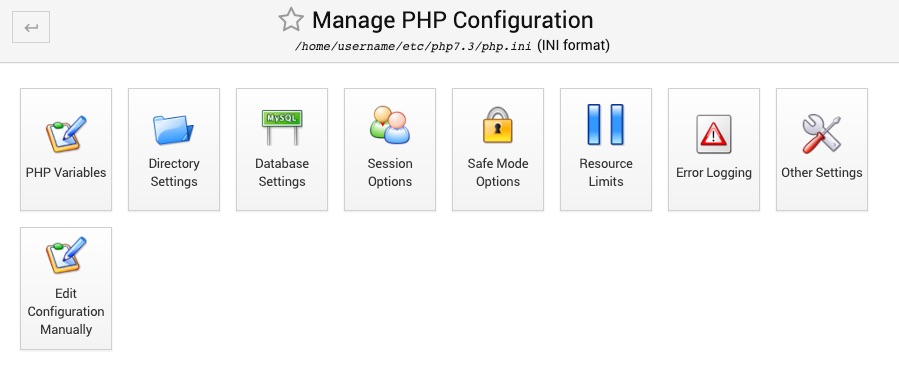
In most cases PHP configuration settings should be left intact as they are well tuned by AltaGrade. If you need to change anything in PHP configuration settings, then it's better to file a ticket on your AltaGrade Dashboard.
Preview Website
Site Manager supports previewing a site before the DNS stuff is pointing to the right place. A quick way to do this is to click Services -> Preview Website. When you click that, Site Manager will retrieve the website, and you will be able to navigate it from within the control panel GUI.
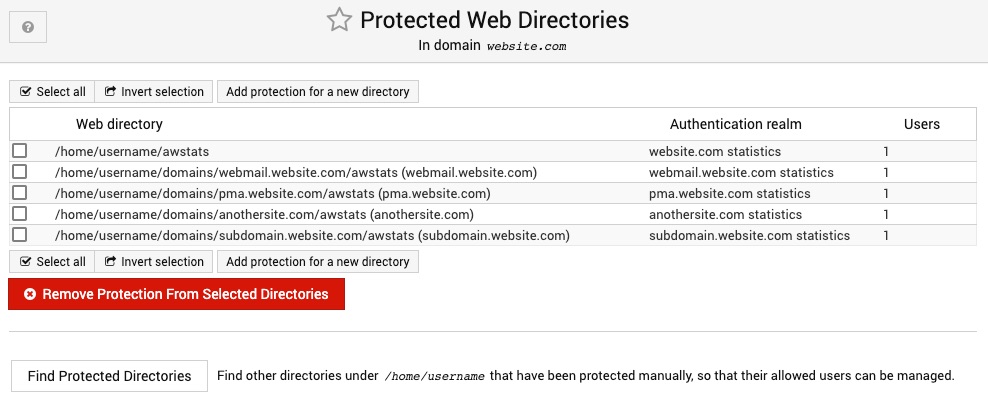
Protected Directories
This page allows you to add password protection for some or all website directories for this virtual server. To protect a directory, use the Add protection for a new directory link. To remove protection, select the checkbox next to the directory name and click the button below the list.
Once protection has been setup, you can control which users have access to it using the Edit Mail and FTP Users page. When you click on a user or create a new one, the Allow access to web directories field can be used to select one or more allow paths from the list you define here.
Mail Options
Email Settings
This page is for configuring email-related settings for a virtual server. If your system supports BCCing sent email (and it is enabled on the Module Config page), the BCC outgoing email to section can be used to select an address to copy mail to.
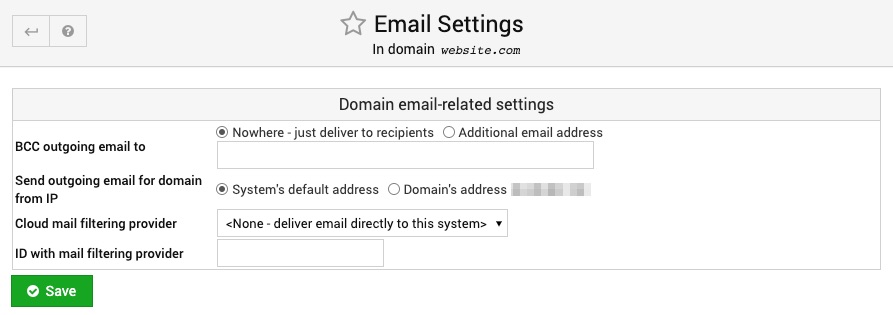
If the virtual server is an alias domain, the Mail aliases mode field controls if mail aliases are copied from the target domain, or if a single catchall alias is created to forward all email to the target. The former mode is not available with all mail servers, but is superior when using Postfix as it allows mail to invalid addresses to be bounced at the SMTP conversation level.
Logs and Reports
Under the Logs and Reports menu you can manage AWstats Configuration, AWstats Report, Apache Access Log, Apache Error Log and view the Logged Host Manager Actions.
AWstat Configurations
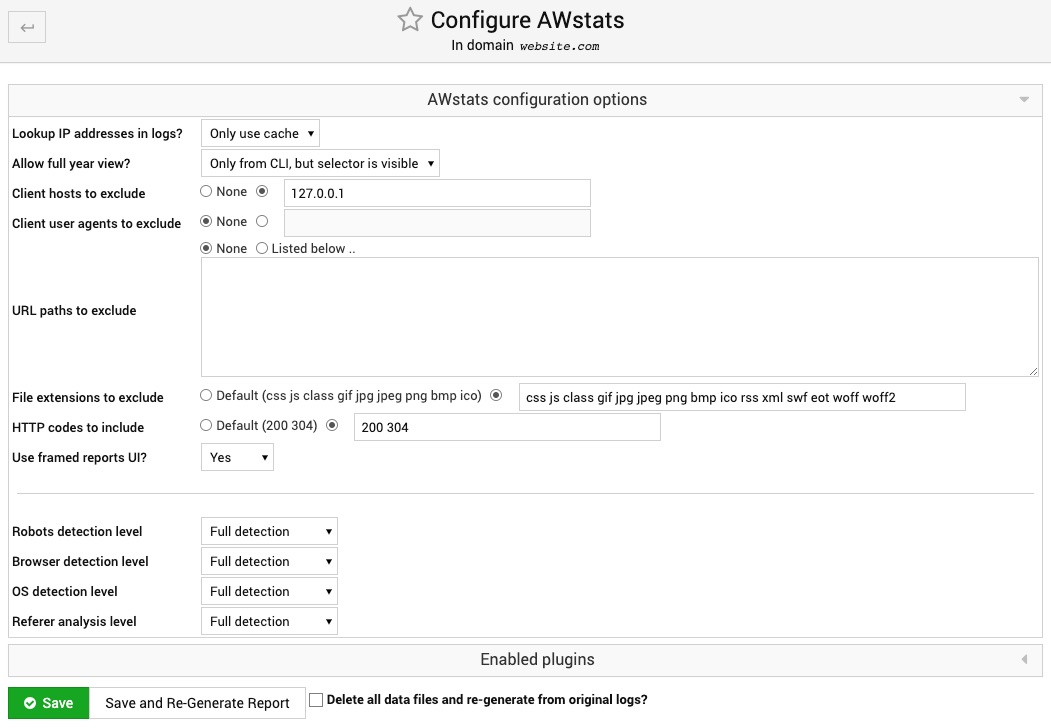
Most websites nowadays rely on professional services like Google Analytics. However, if you prefer not to trust your traffic data to any third parties and keep everything on your AltaGrade server, then you can configure and track statistics using AWstats.
You can change the settings per your liking, but we recommend to leave everything intact, and click on the Save and Re-Generate Report button in order to see the detailed statistics for your website.
AWstats Report
If you had generated AWstats report per previous step, then clicking on the AWstats Report will open a new window showing the detailed statistics for your website.

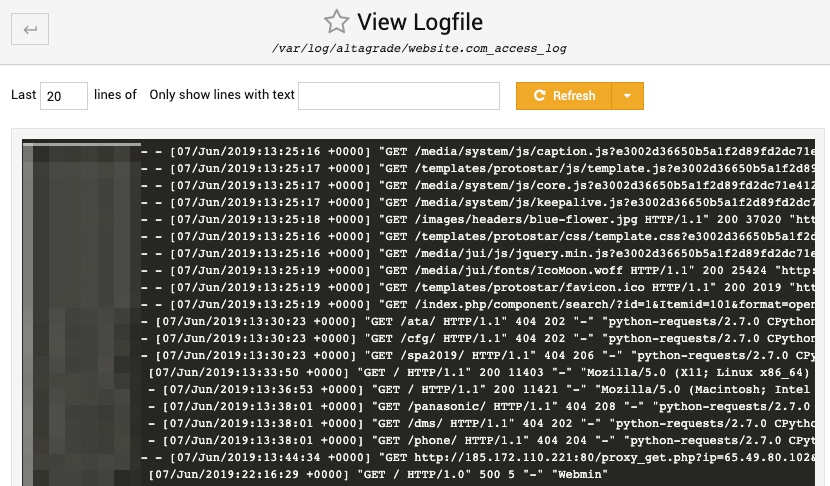
Apache Access Log
Clicking on the Apache Access Log menu link opens a page with the log entries of the latest visitors of your website, including their IP addresses and exact pages on your websites they visited.
To track the access log in live mode, you need to connect to your AltaGrade server via SSH and run the following command:
tail -f /var/log/altagrade/website.com_access_log
where website.com is the domain name of your website.
Apache Error Log
If anything went wrong with your website, then this page is one of the first places you should take a look in the first place, because all the errors of your website are logged in the Apache log file.

To track the error log in live mode, you need to connect to your AltaGrade server via SSH and run the following command:
tail -f /var/log/altagrade/website.com_error_log
where website.com is the domain name of your website.
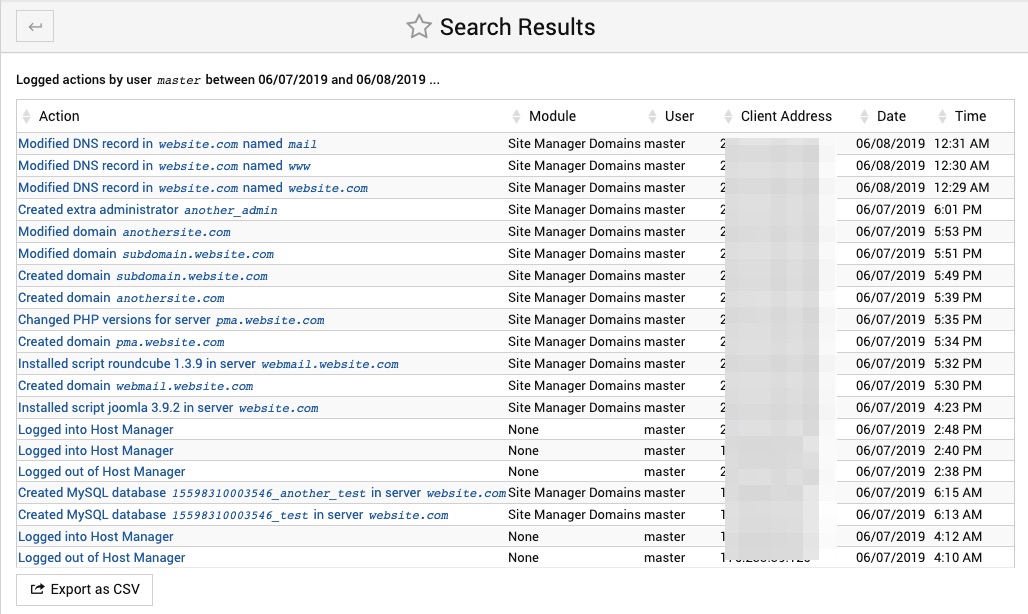
Logged Host Manager Actions
Every important change made by your on your AltaGrade servers' control panel is logged and can be viewed on this page, that lists performed action name, the control panel module the change was made on, username who performed the action, his/her IP address, date and exact time when the action was performed. All the actions can be exported in CVS format.
Backup and Restore
Under the Backup and Restore menu block you will find all the setting options with regard to backing up your websites.
Backup Domains
Please note that all AltaGrade servers come with regular backups already configured on backend. However, if you want to configure additional backups to which you'd have access any time, then this page is to help you to do so. It is still better to request AltaGrade to configure additional backups for you, however if you want to give a try by yourself, then here are some option descriptions.
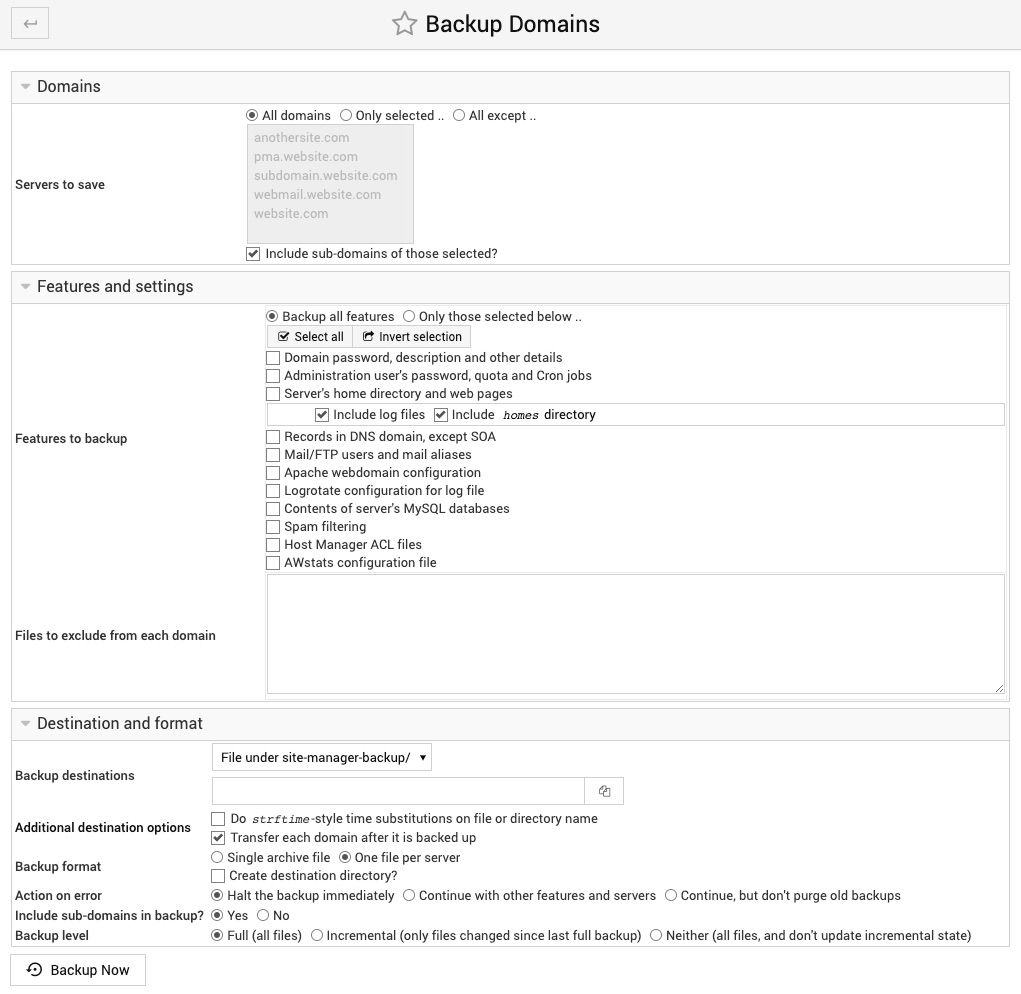
Domains
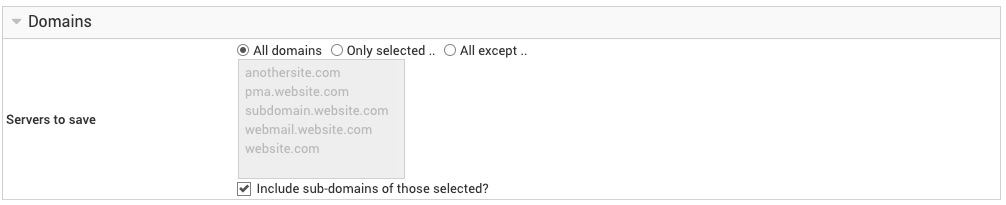
Servers to save
This field controls which Site Manager domains will be included in the backup. You can either select all of them, only those that you specifically choose, or all except some that are chosen.
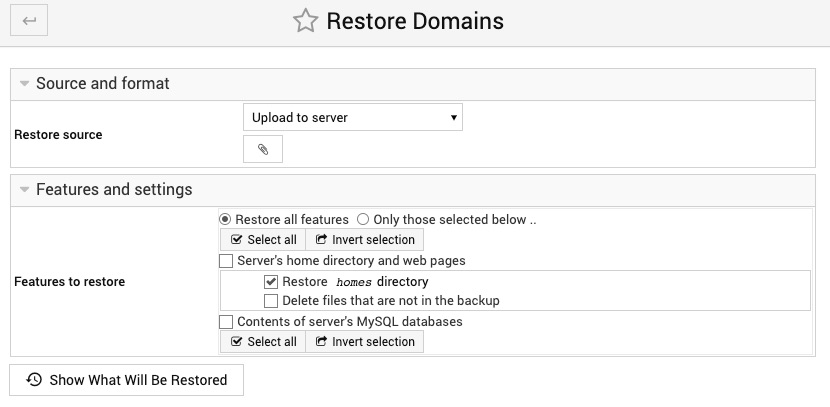
Features and settings
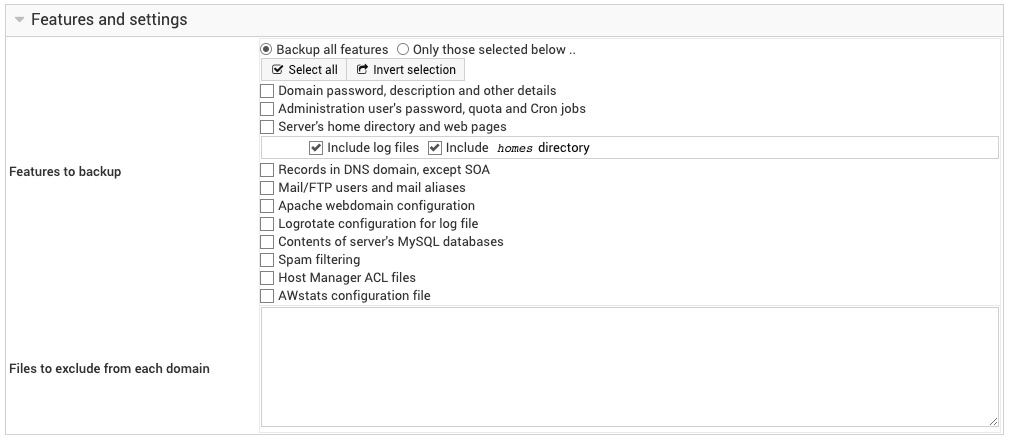
Features to backup
These checkboxes control which information about each virtual server is included in the backup. Typically you will want to include everything, and so all of the feature boxes should be checked.
Some features may have additional options next to them, to control in more detail what is included in the backup. For example, you can choose whether or not the logs directory under each server's home is included, as logs often take up a large amount of disk space, and may not be considered important enough to save.
Be aware that when backing up a server, no information about any sub-servers will be included unless you specifically select them.
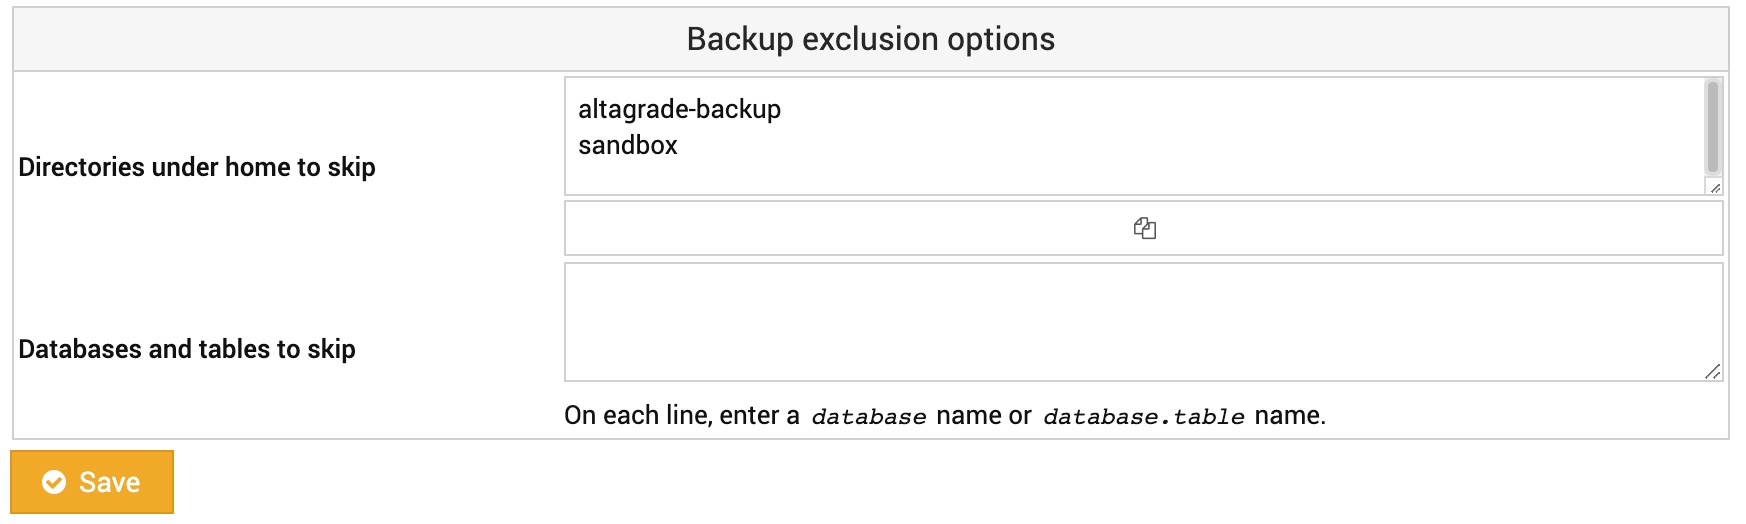
Files to exclude from each domain
This field allows you to enter a list of relative paths to files under each virtual server's home directory to exclude from this backup. To exclude multiple paths, put each on its own line (e.g. separated by linefeeds).
Examples
To exclude an entire directory, provide the relative path from the user's home directory, such as public_html/stats to exclude the Webalizer reports directory or usermails to exclude user mail home directories.
To exclude a single file, provide the relative path to the filename, such as public_html/index.html.
Files can also be specified using wildcards, such as *.log, which will exclude any file with the .log file extension anywhere within the home directory of the domain. A path can also be provided, such as etc/*.ini to exclude all files ending in .ini.
Destination and format
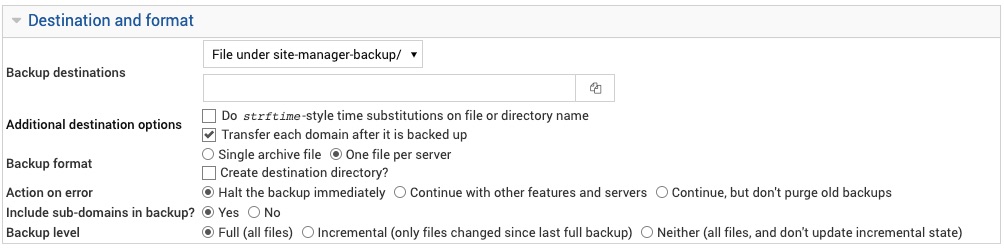
Backup destination
These fields control where the Site Manager backup is written to. You can choose from one of three destination modes:
-
Local file directory
In this mode, the backup is simply saved to a file on the system running Site Manager. If using the Single archive file backup format, you must enter a filename here, like /backup/domainname.tgz. If using either of the One file per server formats, you need to enter a directory instead, like /backup.
-
FTP server
This mode can be used to have the backup file or files uploaded using the FTP protocol to another server. You must enter the server name, login, password and destination file or directory.
-
SSH server
This is similar to the FTP mode, but transfers the backup using the SSH protocol instead.
If the backup format is a single file, then the destination you specify here must be a file, which will be overwritten or created. If creating one file per domain, then the destination must be a directory which already exists.
If backing up to an SSH or FTP server on a non-standard port, you can enter it in the server field separated from the hostname with a colon, like backupserver.yourdomain.com:2222.
If backing up to an SSH server that only supports certificate-based authentication, the password field is optional. However, the root use on the system must have his SSH public key in the destination user's authorized_keys file.
Backup format
This option controls the file format that Site Manager will use for this backup. The available options are:
-
Single archive file
All websites are storing in a single file, in the location specified by the Backup destination.
-
One file per server
Each virtual server is backed up into its own separate file, in the directory specified by the Backup destination.
-
One file per server, in new format
Each website is backed up into its own separate file, but in a different format to the previous option. This new format is superior as it does not require a large file to be created in the /tmp directory first, this saving disk space.
The final option is recommended, as it allowed individual websites to be more easily restored, and saves on temporary disk space during the backup.
Action on error
If the Halt backup immediately option is selected, any error encountered during the backup process (such as the failure of one feature) will cause the entire backup to halt.
On the other hand, the Continue option will not halt the backup just because of a single failure. For automated backups this is superior, as a partial backup is better than none at all.
When set to Continue and purging of old backups is enabled, the purge will still be done even if the backup fails.
Include sub-servers in backup?
When this option is set to Yes, any sub-domain or aliases of the selected domain will be included in the backup. This allows you to easily save your entire hosting account for backup or transferring to another system.
Backup Level
By default, Site Manager backups will include all files in the selected domains' home directories. However, if you regularly backup large websites, a lot of time may be spent copying files that have not changed recently.
If the Incremental option is selected here, only those files that have changed or were created since the last full backup will be included. This is most useful when you have two scheduled backups, such as a weekly full backup and a daily incremental. Assuming that most files in a domain are un-changed day to day, this will substantially reduce the size and time of daily backups.
Be aware that when restoring, you will need to restore first the full backup and then the incremental to recover all files. Also, other data such as Apache configurations and databases is not incrementally backed up, and so will always be included regardless of this option.
The Neither option also performs a full backup, but does not change the incremental backup state. This can be useful when performing an ad-hoc backup of domains that also have full and incremental backups scheduled.
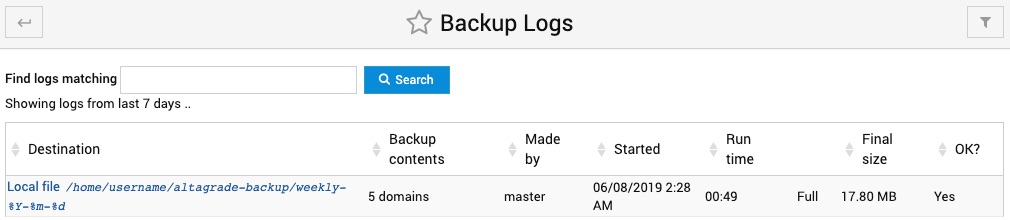
Backup Logs
On this page you can track the logs for all the performed backups indicating how many domains each backup contained, username under which the backup was scheduled, when backup was started, how long it took to complete, final size and the status of each backup.
Restore Backup
On this page you can restore a website using previously taken backup file sourced from one of the following multiple storage places: File under site-manager-backup directory if you didn't move the backup file anywhere remotely, and SSH server, Host Manager server, Amazon S3 bucket, Rackspace Cloud Files or your local computer in case of the backup file had been stored elsewhere.
Running Backups
On this page you can see which backups are currently running. Please note that when scheduling backups make sure not to overlap the execution times for different backups, because no more than 3 backup instances can ran at a time.
Schedule Backups
Please request AltaGrade to properly schedule backups for your websites. If you want to do it by yourself, then note that the options on this page are identical to what has been described on the Backup Domains section, except that it has several more additional settings for schedule and reporting.
Schedule and reporting
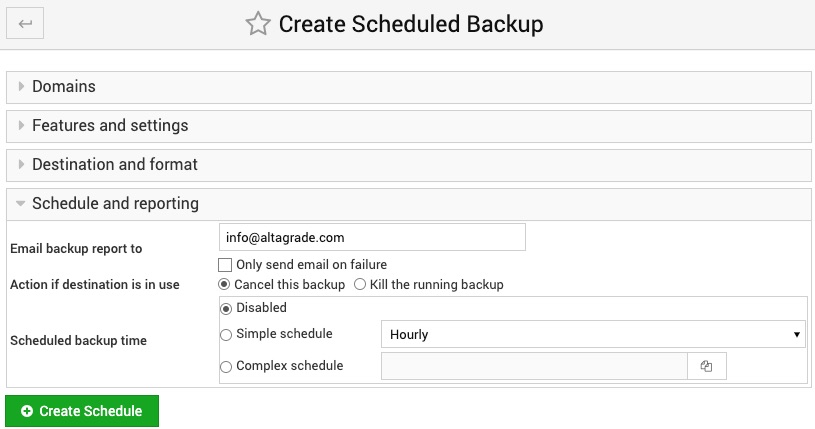
Email backup report to
If an email address is entered here, the results of the automatic backup will be sent to it after the backup is finished. By default it will be sent on both success or failure, but if you prefer to be only notified when something goes wrong, you can select the Only send email on failure option.
To have the same email sent to owners of websites that are backed up, select the Also send email to owners of backed-up servers checkbox.
Action if destination is in use
This option determines what will happen if a Virtualmin backup to the same destination is already in progress. The Cancel this backup option will allow the running backup to complete, and immediately fail this one. The Kill the running backup will terminate the backup that is already executing, allowing this one to start. This can be useful to prevent a stuck backup from blocking all others that would follow it.
Scheduled backup time
To have this backup run automatically on a regular schedule, select Simple schedule and choose an interval from the menu. Or if you want to turn it off for now, select the Disabled option.
If you need more control over the schedule, choose the Complex schedule option and click the button next to it to pop up a window for selecting exactly which hours, minutes and days the backup will be run.
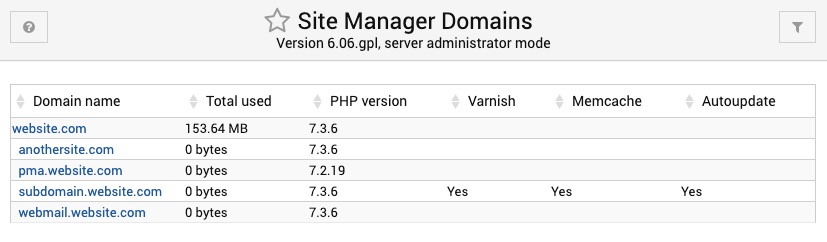
List Domains
On the Lost Domains page you will find all the domains hosted on your AltaGrade server on a table showing domain name, total space storage used, PHP version, Varnish, Memcache and Autoupdate for each websites.
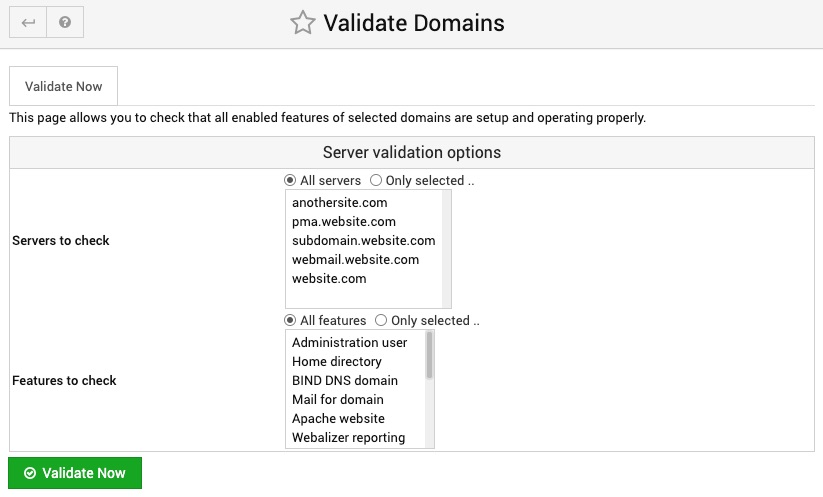
Validate Domains
This page can be used to have Site Manager check that all virtual servers are in the state it expects them to have. It will compare underlying Apache, BIND, Postfix and other config files with the settings for the selected domains, and report any mis-matches found.
It can be useful for finding problems introduced by manually editing configurations, or Site Manager bugs.
You can choose which domains to validate with the Servers to check, and which features within those to examine with the Features to check list.